Kubernetes Security
In this section we will discuss kubernetes security primitives. How does someone gain access to a kubernetes cluster. And how their actions are controlled and monitored.
We then start with various authentication methods available in kubernetes. Default settings, and practice viewing configurations of an existing cluster. We discuss TLS certificates, and how various components within a kubernetes cluster communicate are secured using TLS.
If you are a kubernetes administrator, and you setup a cluster on your own, you are bound to face challenges related to certificates. Which why we will discuss them from ground up from the absolute basics.
We then move on to authorization, and how access to resources is controlled. We discuss Role Based Access Control (RBAC), and how it is implemented in kubernetes. After that we will tackle how to secure images in your environment, Finally security context and network policies.
Security Primitives
We will begin with the host that formed the cluster itself. All access to these hosts must be secured. E.g. root access is disabled and password based authentication. Only ssh key to be made available. Also, any other measures you need to make to secure your physical or virtual infrastructure.
If the host is compromised, everything is compromised.
Our focus in this section is more on kubernetes related security. What are the risks and the measures you need to take to secure your cluster. The kube-apiserver is at the center of all operations in kubernetes. We interact with it by the kubectl utility or by accessing the API directly. Through that you can perform any operation in the cluster. That is the first line of defense we will tackle.
Controlling access to the API server itself. We need to make two types of decisions:
- Who can access the API server?
- What can they do once they have access?
Who can access the API server? is defined by the authentication mechanism. There are different ways to authenticate to the API server. Starting with username and password stored in a static file, to tokens, to certificates, to even integrating with an external identity provider like LDAP. Finally, for machines we create service accounts.
Once they can access the cluster. What can they do? is defined by the authorization mechanism. Authorization is implemented using role based access control (RBAC). Where users are associated with groups with specific permissions. In addition there are other authorization modules like The Attribute Based Access Control (ABAC), Node Authorization and Webhook Mode ...etc.
All communication within the cluster, between various components such as etcd cluster, kube-controller-manager, kube-scheduler, api-server, as well as those running on the worker nodes such as the kubelet and kube-proxy, is secured using TLS certificates.
What about communication between applications within the cluster. By default all pods can access all other pods within the cluster. You can restrict this using Network Policies.
Authentication
A kubernetes cluster consists of multiple nodes wether physical or virtual. And various components that work together. We have users like admins that access the cluster to perform administrative tasks. And there are developers that access the cluster to test or deploy applications. We have end users that access the applications running in the cluster. ALso, third party applications that access the cluster to perform some operations or integration purposes.
Thought this section we will discuss how to secure our cluster by securing the communication internal components. And securing management access to the cluster through authentication and authorization mechanisms.
In this sub heading our focus is on securing access to the k8s cluster with authentication mechanisms.
Security of end users who access the applications deployed on the cluster is managed by applications themselves. So, they are out of this discussion for now.
Our focus is on users access to the k8s cluster for administrative purposes. So, we are left with two types of users:
- User: Admins, Developers.
- Service Accounts: Used by applications running in the cluster to access the k8s API.
Kubernetes does not manages user accounts natively. It relies on an external source like a file with user details or certificates. Or an external identity provider like LDAP to manage these users.
You can NOT create a user in k8s cluster or list them like the following:
kubectl get users
kubectl create user ziadh
However, in case of service accounts, kubernetes can manage them.
kubectl create serviceaccount sa1
kubectl get serviceaccount
Users
All user access is managed by the kube-apiserver. Wether you are accessing the cluster through the kubectl utility or through the API directly curl https://kube-apiserver-ip:6443.
- The
kube-apiserverauthenticates the request. - The
kube-apiserverprocess the request.
How does the kube-apiserver authenticate the request?
There are different authentication mechanisms that can be configured:
- A list of username and password in a static password file.
- Username and tokens in a static token file.
- Certificates.
- External identity providers like LDAP.
- This is not a recommended authentication mechanism. Username passwords/tokens. Insecure.
- Consider volume mount while providing the auth file in a kubeadm setup.
- Setup Role Based Authorization for the new users.
Static Password and Token Files
The file has three required columns and an optional fourth column.
<password>,<username>,<uid>,<groupId>
testing321,ziadh,u0001,g0001
Then pass the file name as an option to the kube-apiserver --basic-auth-file=user-details.csv. Then restart the kube-apiserver process. For these options to take effect.
Example:
curl -v -k https://master-node-ip:6443/api/v1/pods -u ziadh:testing321
kubectl get pods --username=ziadh --password=testing321
Static Token File
Same as the above but instead of a password, a token is specified.
<token>,<username>,<uid>,<groupId>
Kp2d3e4f5g6h7i8j9k0l,ziadh,u0001,g0001
Then pass the file as an option to the kube-apiserver --token-auth-file=token-details.csv. Then restart the kube-apiserver process. For these options to take effect.
curl -v -k https://master-node-ip:6443/api/v1/pods --header "Authorization: Bearer Kp2d3e4f5g6h7i8j9k0l"
Setting Basic Authentication
Setup basic authentication on Kubernetes (Deprecated in 1.19)
This is not recommended in a production environment. This is only for learning purposes. Also note that this approach is deprecated in Kubernetes version 1.19 and is no longer available in later releases
Follow the below instructions to configure basic authentication in a kubeadm setup.
- Create a file with user details locally at
/tmp/users/user-details.csv:
password123,user1,u0001
password123,user2,u0002
password123,user3,u0003
password123,user4,u0004
password123,user5,u0005
- Edit the kube-apiserver static pod configured by kubeadm to pass in the user details. The file is located at
/etc/kubernetes/manifests/kube-apiserver.yaml:
apiVersion: v1
kind: Pod
metadata:
  name: kube-apiserver
  namespace: kube-system
spec:
  containers:
  - command:
    - kube-apiserver

    image: k8s.gcr.io/kube-apiserver-amd64:v1.11.3
    name: kube-apiserver
    volumeMounts:
    - mountPath: /tmp/users
      name: usr-details
      readOnly: true
  volumes:
  - hostPath:
      path: /tmp/users
      type: DirectoryOrCreate
    name: usr-details
- Modify the kube-apiserver startup options to include the basic-auth file:
apiVersion: v1
kind: Pod
metadata:
  creationTimestamp: null
  name: kube-apiserver
  namespace: kube-system
spec:
  containers:
  - command:
    - kube-apiserver
    - --authorization-mode=Node,RBAC
    - --basic-auth-file=/tmp/users/user-details.csv
- Create the necessary roles and role bindings for these users:
---
apiVersion: rbac.authorization.k8s.io/v1
kind: Role
metadata:
  namespace: default
  name: pod-reader
rules:
- apiGroups: \[""\] # "" indicates the core API group
  resources: \["pods"\]
  verbs: \["get", "watch", "list"\]
---
# This role binding allows "jane" to read pods in the "default" namespace.
apiVersion: rbac.authorization.k8s.io/v1
kind: RoleBinding
metadata:
  name: read-pods
  namespace: default
subjects:
- kind: User
  name: user1 # Name is case sensitive
  apiGroup: rbac.authorization.k8s.io
roleRef:
  kind: Role #this must be Role or ClusterRole
  name: pod-reader # this must match the name of the Role or ClusterRole you wish to bind to
  apiGroup: rbac.authorization.k8s.io
- Once created, you may authenticate into the kube-api server using the users credentials:
curl -v -k https://localhost:6443/api/v1/pods -u "user1:password123"
TLS
TLS is an abbreviation for Transport Layer Security. In this section we will discuss securing cluster with TLS and troubleshooting TLS related issues. As they can be especially difficult if you are not familiar with basics of TLS certificates.
TLS Basics
A certificate is used to guarantee trust between two parties during a transaction. E.g. when a user tries to access a web server, TLS ensures that the communication between the user and the server is encrypted. And the server is who it claims to be.
We will generate a private and a public key using openssl. At server:
# Strong Passphrase (Optional): To encrypt your private key with a passphrase, add the `-aes256` or `-des3` flag to the genpkey command. You'll be prompted to enter a secure passphrase.
openssl genpkey -algorithm Ed25519 -out my-blog-private.key
chmod 400 my-blog-private.key
openssl pkey -in my-blog-private.key -pubout -out my-blog-public.pub
Generate RSA Private and Public Key
# Use 2048, 3072, or 4096 bits
openssl genrsa -out my-blog-private.key 4096
my-blog-private.key
# chmod 400 my-blog-private.key  # Read-only for the owner
openssl rsa -in my-blog-private.key -pubout -out my-blog-public.key
my-blog-public.key
What if you could look at the public key you received from a website and verify it is a legitimate key from the authentic blog. The server does not send the key alone it sends a certificate that has the key in it.
The certificate contains important information, like who the certificate is issued to, the public key of that server, the location, ...etc.
Every certificate has a name on it called the Common Name (CN). This is the name of the server that the certificate is issued to. The certificate is signed by a Certificate Authority (CA). The CA is a trusted third party that signs the certificate.
The CN is a very important filed that helps you validate their identity. If this is for a web server this must match what the user types in the url of his browser.
If the bank/blog/webserver is known by any other names, and if they like their users to access their application with the other names as well, Then all those names should be specified in the certificate under the Subject Alternative Name (SAN) field.
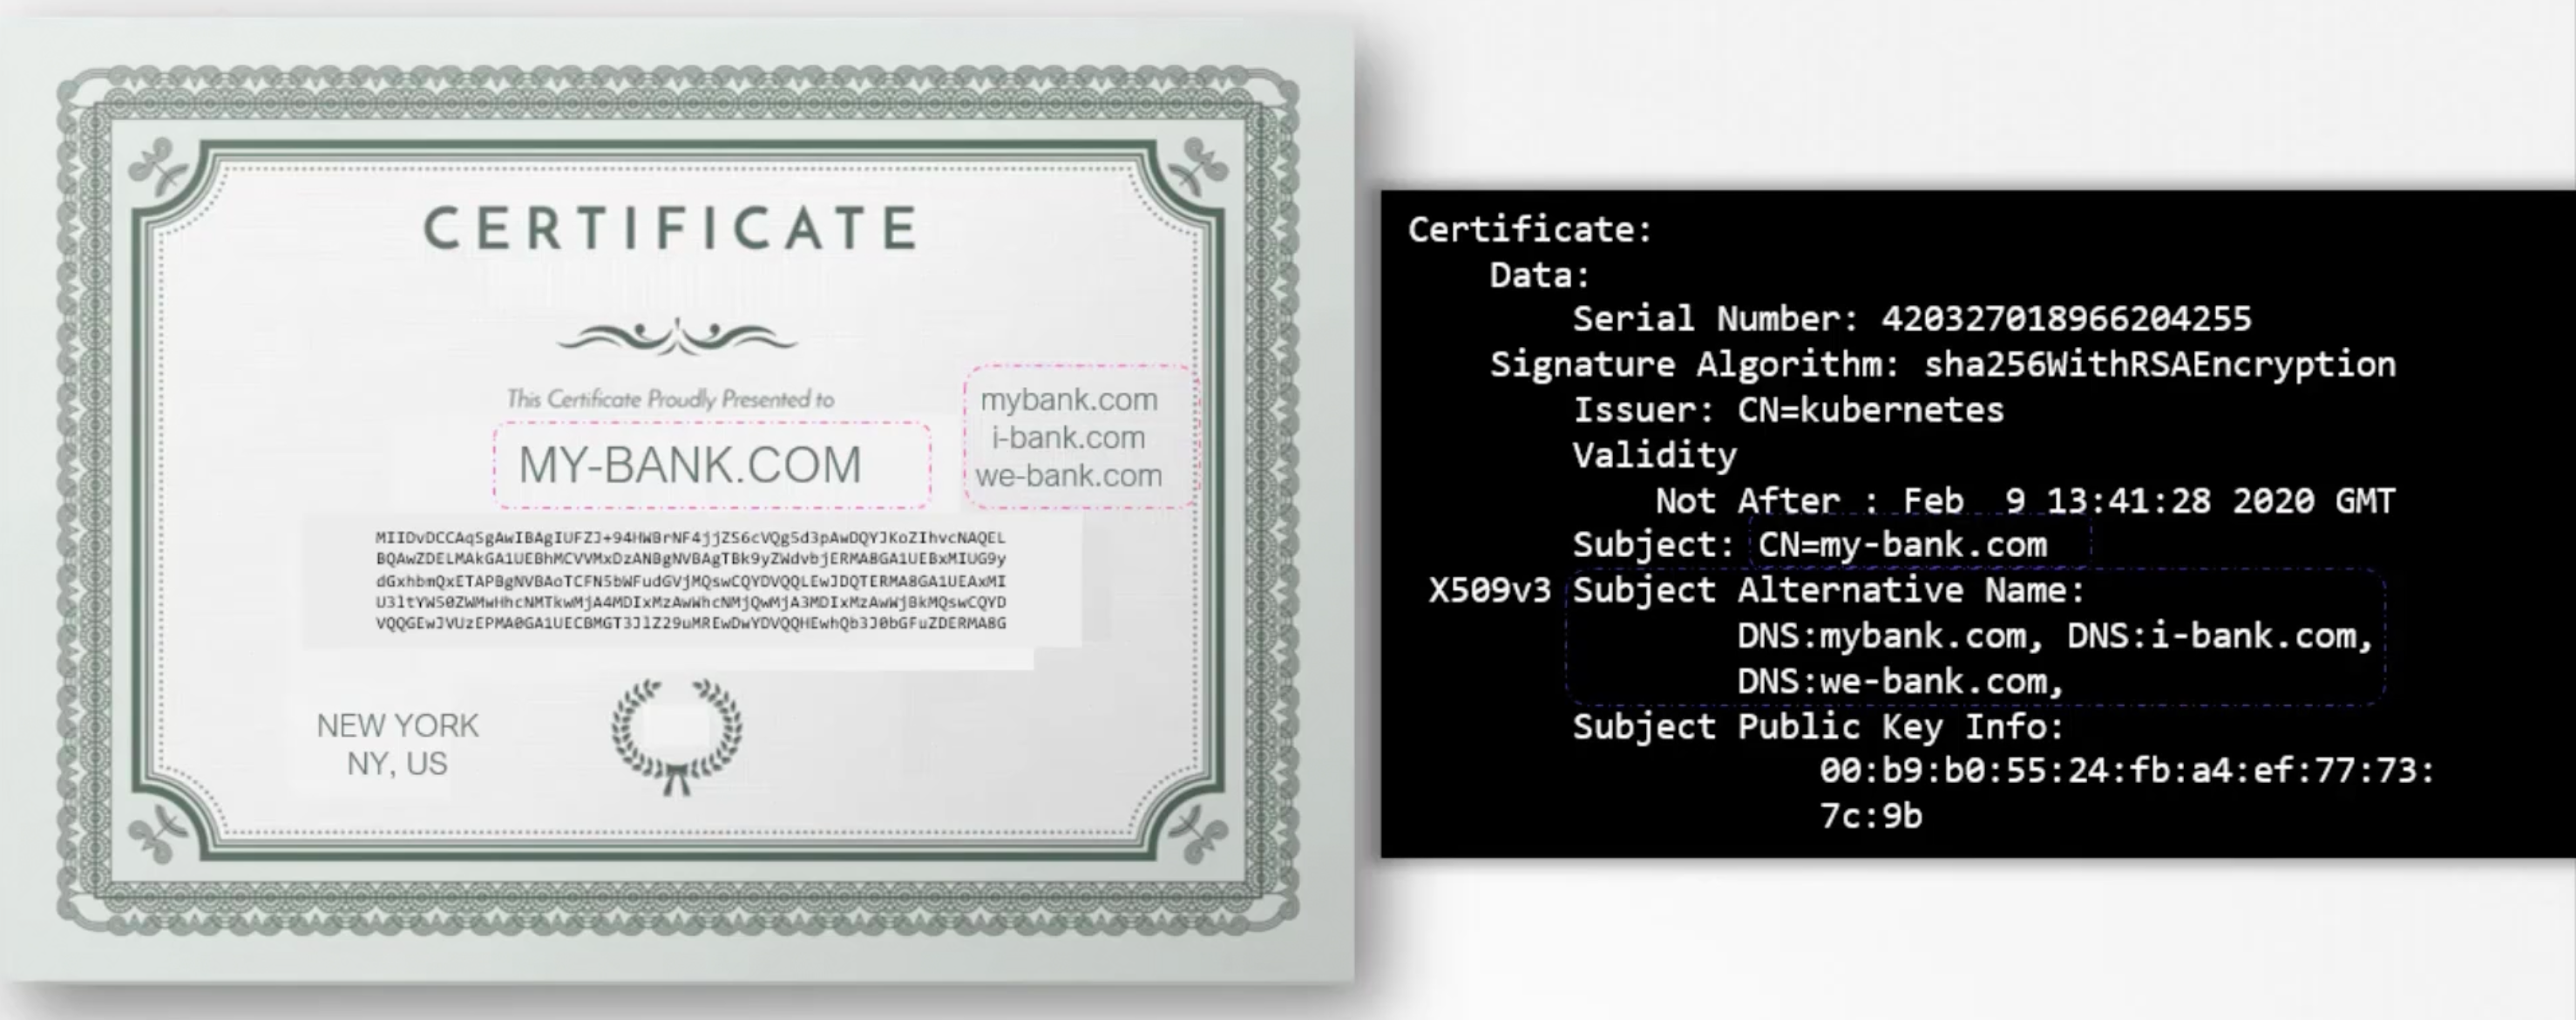
Anyone can generate a certificate like this, you can generate one saying you are google.com and that is what the hacker did in this case.
So How do you look at a certificate and verify if it is legit?
That is where the most important part of the certificate comes into play. Who signed and issued the certificate. If you generate the certificate then you will have to sign it by yourself. That is called a self signed certificate. Anyone looking at it will immediately know that this is not a safe/trusted certificate.
All the browsers are built in with a certificate validation mechanism. Where the browser checks certificates received from the server and validates it.
The answer is Certificate Authorities (CA). They are trusted third parties that sign certificates. And are well known organizations. Symantec, Digicert, Comodo, GlobalSign, ...etc.
The way this works is you generate a certificate signing request (CSR) using the key you generated. earlier and the domain name of your website. You can do this again using openssl command. openssl req -new -key my-bank.key -out my-bank.csr -subj "/C=US/ST=CA/O=MyOrg, Inc./CN=my-bank.com" This will generate a my-bank.csr file which is the certificate signing request that should be sent to the CA for signing CN=my-bank.com looks like this:
-----BEGIN CERTIFICATE REQUEST-----
MIICyjCCAbICAQAwgZQxCzAJBgNVBAYTAlVTMQswCQYDVQQIDAJDQTEUMBIGA1UE
BwwLU2FudGEgQ2xhcmExDjAMBgNVBAoMBU15T3JnLCBJbmMuMRQwEgYDVQQLDAtN
...
eU9yZywgSW5jLjEUMBIGA1UEAwwLbXktYmFuay5jb20xJzAlBgkqhkiG9w0BCQEW
Gm15LWJhbmthdW1lZEBnbWFpbC5jb20wggEiMA0GCSqGSIb3DQEBAQUAA4IBDwAw
------END CERTIFICATE REQUEST-----
The CA will verify your details and once it checks out they sign the certificate and send it back to you. You now have a certificate signed by a trusted CA.
How does the browser know if the certificate is signed by a trusted CA?
In this case our certificate was signed by a CA called Symantec.
- How would the browser know Symantec is a valid CA?
- And that the certificate was in fact signed by Symantec? And not by someone pretending to be Symantec?
The CA themselves have a set of public and private keys pairs. The CA use their private keys, to sign the certificates. The public keys of all the CAs are built-in to the browsers. The browser uses the public key of the CA to verify the signature of the certificate. You can actually see them in the browser settings of your browser under Certificates then Trusted Root Certificate Authorities tab.
However they don't help validate sites hosted privately. Say within your organization. For example accessing you payroll or internal email application. For that you can host your own private CA. Most of the companies list above have a private offering of their services. A CA server that you can deploy internally within your company.
You can then have the public key of your internal CA server installed on all your employees browsers. And establish secure connectivity within your organization.
All the mentioned above is known as PKI (Public Key Infrastructure).
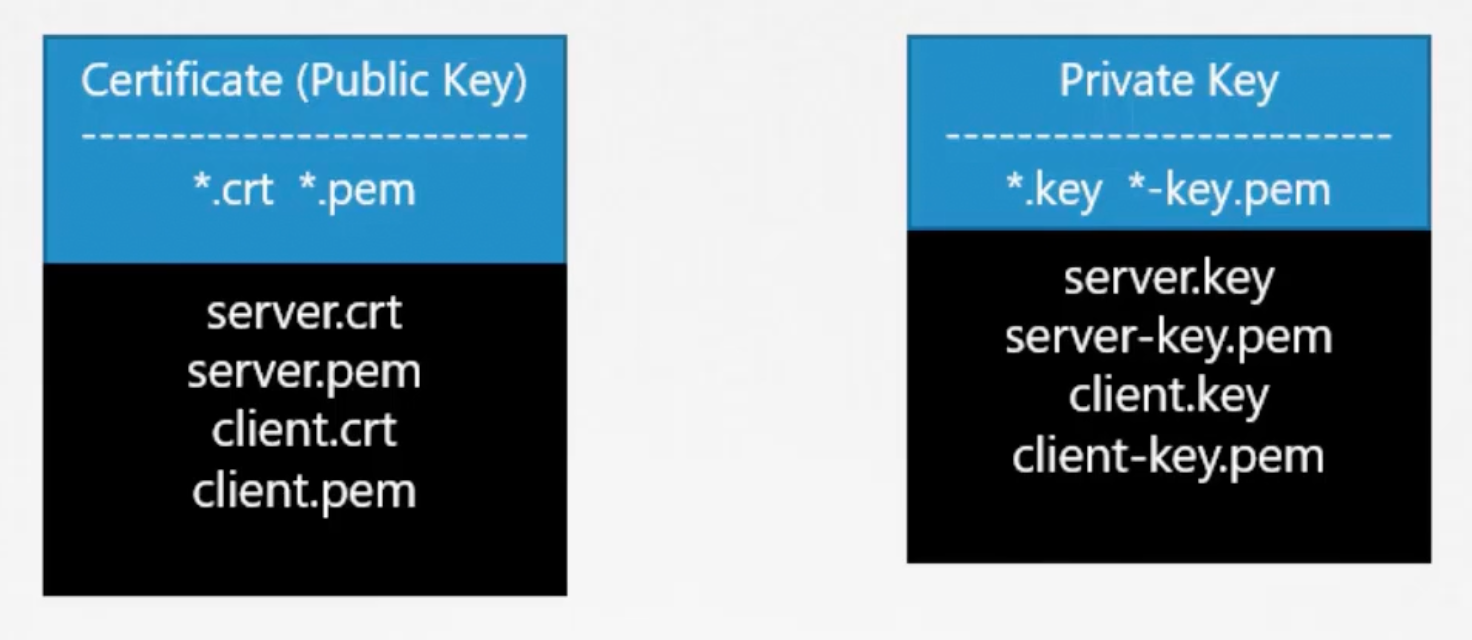
Usually certificates with public keys are named with .crt or .pem extensions. And private keys are named with .key or -key.pem extensions.
Kubernetes Certificates
A kubernetes cluster consists of multiple nodes, both master and worker nodes. All communication between nodes need to be secured and must be encrypted. Wether an administrator is accessing kube-apiserver with kubectl or communication between all components in the cluster. All must be encrypted.
Two primary requirements:
- All various services within the cluster to use server certificates.
- All clients to use client certificates. TO verify they are who they claim to be.s
Server Components
- kube-apiserver: We have
apiserver.crtandapiserver.key. - etcd-server: We have
etcdserver.crtandetcdserver.key. - kubelet-server: We have
kubelet.crtandkubelet.key.
Clint Components
- administrators: We have
admin.crtandadmin.key. - kube-scheduler: We have
scheduler.crtandscheduler.key. - kube-controller-manager: We have
controller-manager.crtandcontroller-manager.key. - kube-proxy: We have
kube-proxy.crtandkube-proxy.key.
The only client to the etcd is the kube-apiserver. So, we can use same pair or generate a new pair for the kube-apiserver to communicate with etcd as a client apiserver-etcd-client.crt and apiserver-etcd-client.key. Also the kube-apiserver talks to the kubelet on each of the worker nodes. So, we can generate apiserver-kubelet-client.crt and apiserver-kubelet-client.key.
Summary
- Client certificates are used by clients to authenticate themselves to the server.
- Server certificates are used by the server to authenticate themselves to the clients.
Certificate Authority (CA)
Kubernetes requires you to have at least one CA for your cluster. In fact you can have more than one, one for all the components in the cluster and another one specifically for ETCD. In that case the etcd servers certificates and the etcd servers client certificates which in this case are the apiserver client certificate will be all signed by the etcd server CA.
We will stick to one CA for now. The CA as we know has its own pair of certificate and key we will call it ca.crt and ca.key.
That should sum up all the certificates used in the cluster.
Generate The Certificates
To generate certificates there are different tools available. Such as easyrsa, cfssl, openssl, ...etc. We will use openssl in this case.
We will start with the CA certificates. First we generate the private key for the CA:
openssl genrsa -out ca.key 2048
Then we use the openssl requests command along with the key just created to generate a certificate signing request (CSR), the certificate signing request is like a certificate with all of your details but with no signature. In the certificate signing request we specify the name of the component this certificate is for in the Common Name (CN) field. In this case since we are creating a certificate for the Kubernetes CA, we name it KUBERNETES-CA.
openssl req -new -key ca.key -out ca.csr -subj "/CN=KUBERNETES-CA"
Finally, we sign the certificate using openssl x509 command and by specifying the certificate signing request we generated previously. Since it this is for the CA itself, it is self-signed by the CA using its own private key that it generated earlier.
openssl x509 -req -in ca.csr -signkey ca.key -out ca.crt
Going forward for all other certificates we will use this CA key pair to sign them. The CA now has its private key and root certificate file.
Generate Client Certificates
We will start with the admin user:
# [1]: Private Key
openssl genrsa -out admin.key 2048
# [2]: Certificate Signing Request - CSR
# ---> Name could be anything, but, this is the name that kubectl client authenticates with. And when you run kubectl commands. So in the audit logs and elsewhere this is the name that will see. Provide a relevant name in this field.
openssl req -new -key admin.key -out admin.csr -subj "/CN=ziadh-kube-admin/O=system:masters"
# [3]: Sign the certificate
openssl x509 -req -in admin.csr -out admin.crt -CA ca.crt -CAkey ca.key
How do you differentiate between this user and other users?!
The user account needs to be identified as an admin user and not just another basic user. You do that by adding the group details for the user in the certificate Signing Request. In this case a group named system:masters exists on the kubernetes cluster with administrative privileges.
Once it is signed we now have our certificate for the admin user with admin privileges.
We follow the same process to generate client certificates for all other components that access the kube-apiserver.
Kube Scheduler, is a system component part of the k8s control plane. So its name must be prefixed with system:. The same with the kube-controller-manager it is a system component also. And finally kube-proxy too.
# [1]: Private key, CSR, and crt for kube-scheduler
openssl genrsa -out kube-scheduler.key 2048
openssl req -new -key kube-scheduler.key -out kube-scheduler.csr -subj "/CN=system:kube-scheduler"
openssl x509 -req -in kube-scheduler.csr -out kube-scheduler.crt -CA ca.crt -CAkey ca.key

# [2]: Private key, CSR, and crt for kube-controller-manager
openssl genrsa -out kube-controller-manager.key 2048
openssl req -new -key kube-controller-manager.key -out kube-controller-manager.csr -subj "/CN=system:kube-controller-manager"
openssl x509 -req -in kube-controller-manager.csr -out kube-controller-manager.crt -CA ca.crt -CAkey ca.key

# [3]: Private key, CSR, and crt for kube-proxy
openssl genrsa -out kube-proxy.key 2048
openssl req -new -key kube-proxy.key -out kube-proxy.csr -subj "/CN=system:kube-proxy"
openssl x509 -req -in kube-proxy.csr -out kube-proxy.crt -CA ca.crt -CAkey ca.key
So far we have generated CA certificates and all client certificates. Except the remaining three client certificates for apiserver, and kubelet. When we create the service certificates for them. So, we will set them aside for now.
Now what you do with these certificates. Take the admin certificate for instance to manage the cluster. Use it instead of a username and a password in an API call.
curl --key admin.key --cert admin.crt --cacert ca.crt https://kube-apiserver-ip:6443/api/v1/pods
That is one simple way, the other way is to move all of these parameters into a configuration file called kubeconfig.
apiVersion: v1
clusters:
- cluster:
    certificate-authority: ca.crt
    server: https://kube-apiserver:6443
  name: kubernetes
kind: Config
users:
- name: ziadh-kube-admin
  user:
    client-certificate: admin.crt
    client-key: admin.key
In kubernetes for these various components to verify each other, they need a copy of the CA root certificate. So, you need to distribute the CA certificate ca.crt to all the components in the cluster.
Generate Server Certificates
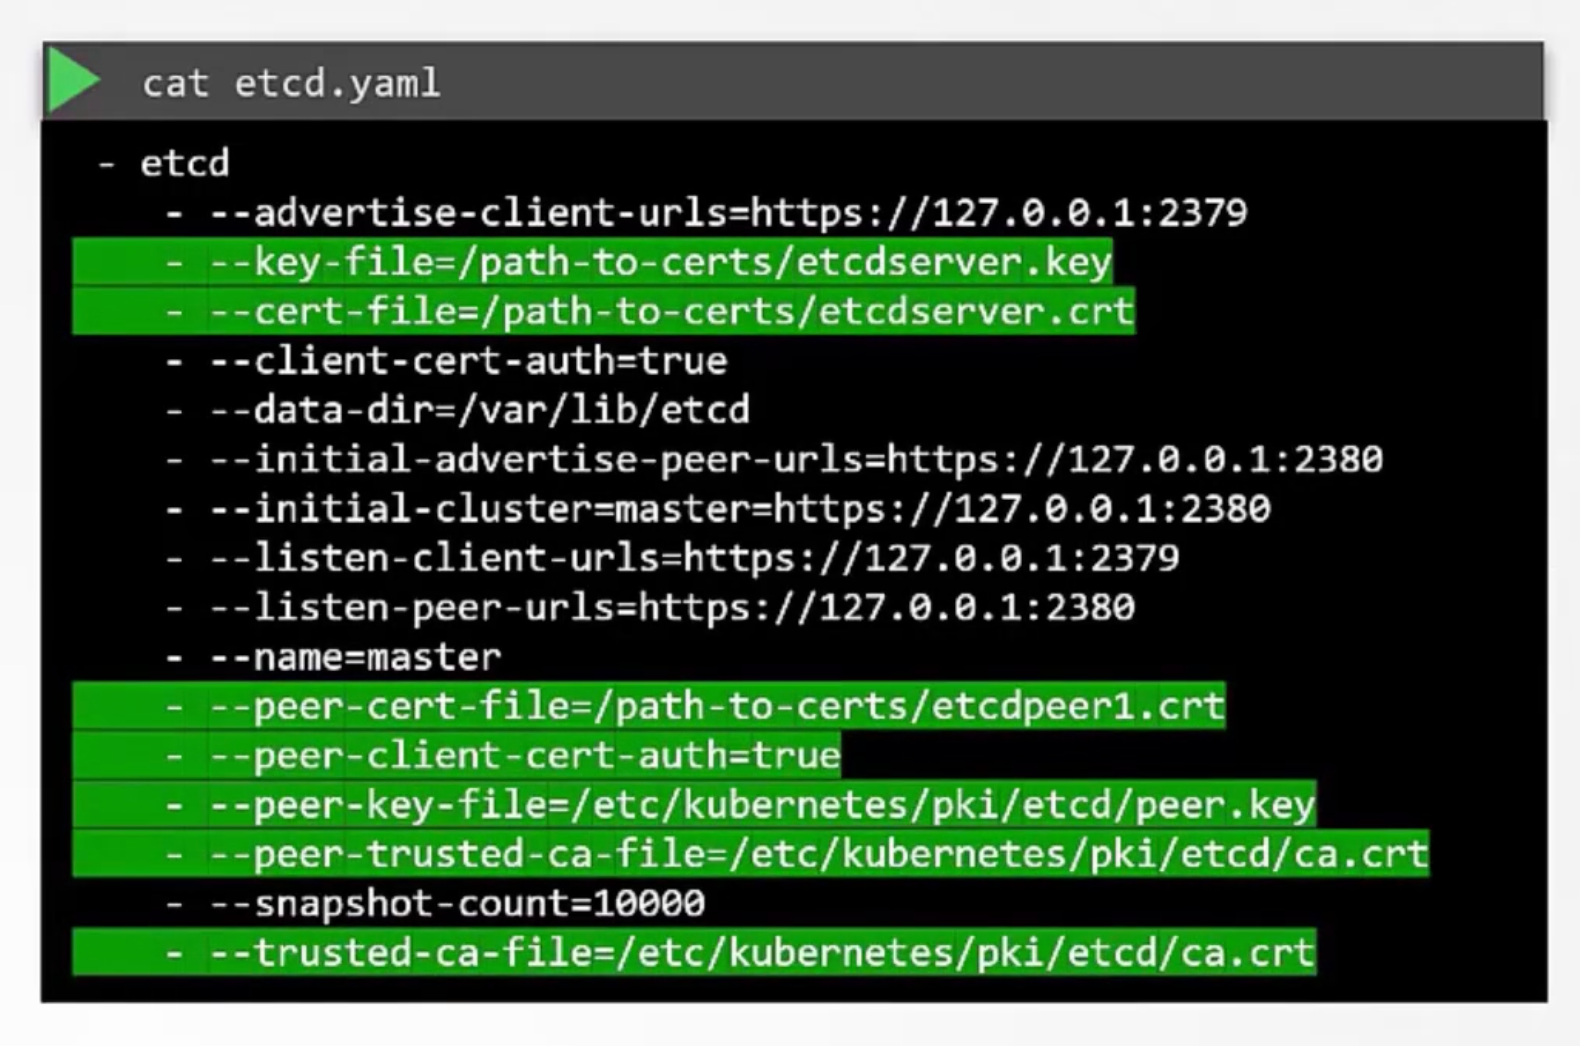
Let's start with the etcd server certificates, we will name it etcd-server. Etcd can be deployed as a cluster across multiple servers as an HA environment. In that case to secure the communication between the different members in the cluster. We must generate additional peer certificates. Once the certificates are generated specify them while starting the etcd server.
There are key and cert file options where you specify the etcd server key and cert file. There a are other options available for specifying the peer key and cert files. And finally as we discussed earlier it requires the CA root certificate to verify the clients.
# [1]: Private key, CSR, and crt for etcd-server
openssl genrsa -out etcd-server.key 2048
openssl req -new -key etcd-server.key -out etcd-server.csr -subj "/CN=etcd-server"
openssl x509 -req -in etcd-server.csr -out etcd-server.crt -CA ca.crt -CAkey ca.key

# [2]: Private key, CSR, and crt for etcd-peer
openssl genrsa -out etcd-peer.key 2048
openssl req -new -key etcd-peer.key -out etcd-peer.csr -subj "/CN=etcd-peer"
openssl x509 -req -in etcd-peer.csr -out etcd-peer.crt -CA ca.crt -CAkey ca.key
It is now the turn of the kube-apiserver, it goes by many names and aliases within the cluster. it's real name is kube-apiserver but some call it kubernetes. Other like to call it kubernetes.default or kubernetes.default.svc. And some prefer the full name kubernetes.default.svc.cluster.local. Finally it is also referred to in some places simply by its ip address. The ip address of the host running the kube-apiserver. Or the pod running it. So, all these names must be present in the certificate under the Subject Alternative Name (SAN) field. Only then those referring to kubernetes by these names will be able to establish a valid connection.
openssl genrsa -out apiserver.key 2048
Create an openssl configuration file openssl.cnf:
[req]
req_extensions = v3_req
distinguished_name = req_distinguished_name
[ v3_req ]
basicConstraints = CA:FALSE
keyUsage = nonRepudiation,
subjectAltName = @alt_names
[alt_names]
DNS.1 = kubernetes
DNS.2 = kubernetes.default
DNS.3 = kubernetes.default.svc
DNS.4 = kubernetes.default.svc.cluster.local
IP.1 = 10.96.0.1
IP.2 = 172.17.0.87
openssl req -new -key apiserver.key -out apiserver.csr -config openssl.cnf \
-subj "/CN=kube-apiserver"

openssl x509 -req -in apiserver.csr -out apiserver.crt -CA ca.crt -CAkey ca.key -CAcreateserial -extensions v3_req -extfile openssl.cnf -days 1000
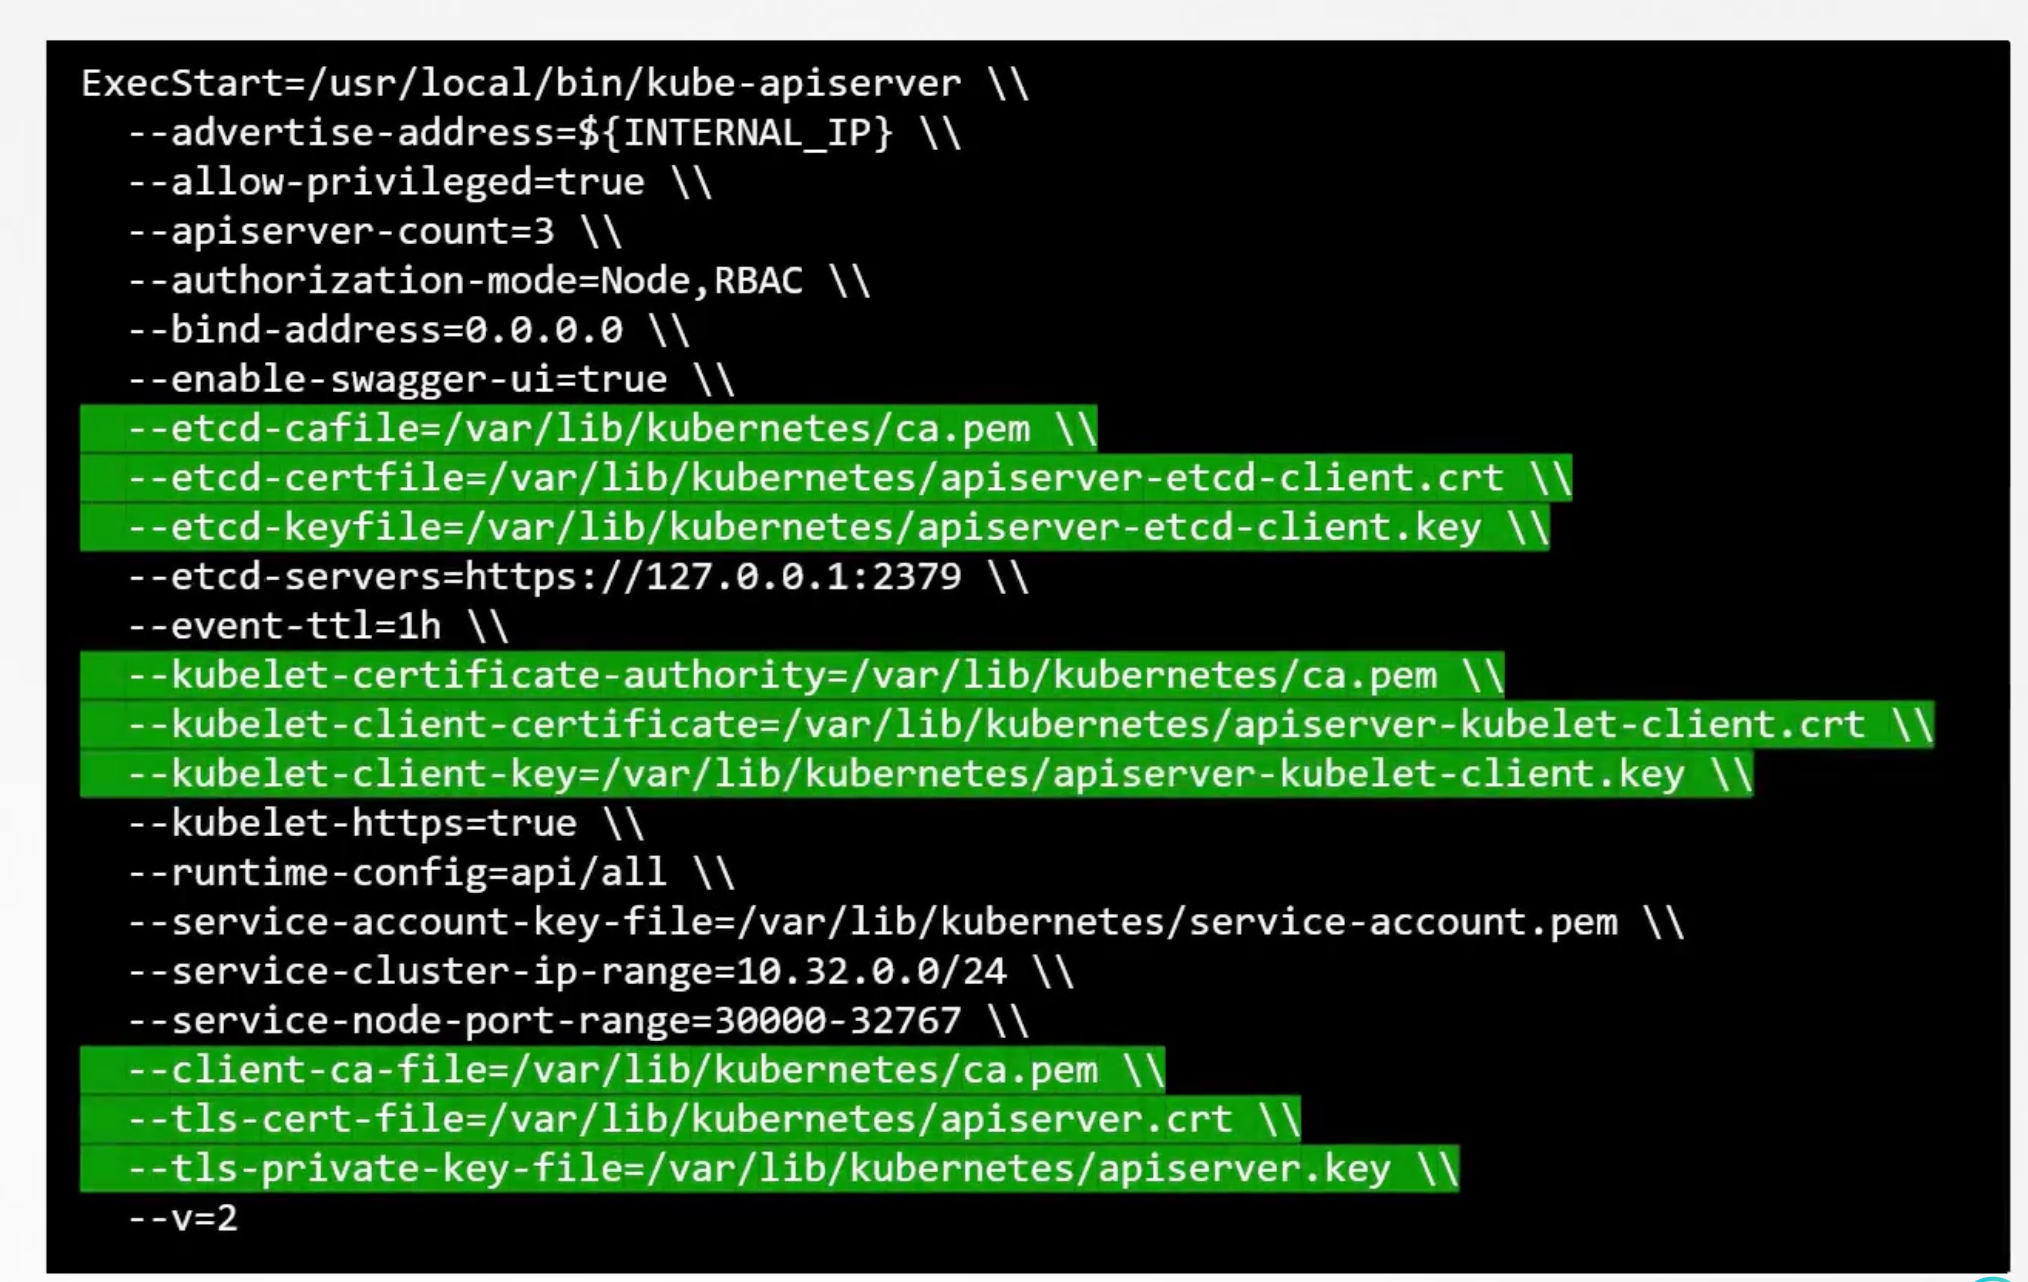
Don't forget the apiserver client certificates used by the apiserver while communicating as a client with etcd and kubelet servers. The location of these certificates are passed in the kube-apiserver configuration file.
First, pass the ca root certificate file path.
Then provide the apiserver certificates.
We then specify the apiserver client certificate to connect to the etcd server with the CA file. And finally the apiserver client certificate to connect to the kubelet server with the CA file.
Pass them to configuration file in the following order:
- Pass the ca root certificate file path:
--client-ca-file=/var/lib/kubernetes/ca.crt.
- Provide the apiserver certificates:
--tls-cert-file=/var/lib/kubernetes/apiserver.crt.--tls-private-key-file=/var/lib/kubernetes/apiserver.key.
- Specify the apiserver client certificate to connect to the etcd server with the CA file:
--etcd-cafile=/var/lib/kubernetes/ca.crt.--etcd-certfile=/var/lib/kubernetes/apiserver-etcd-client.crt.--etcd-keyfile=/var/lib/kubernetes/apiserver-etcd-client.key.
- Finally the apiserver client certificate to connect to the kubelet server with the CA file:
--kubelet-certificate-authority=/var/lib/kubernetes/ca.crt.--kubelet-client-certificate=/var/lib/kubernetes/apiserver-kubelet-client.crt.--kubelet-client-key=/var/lib/kubernetes/apiserver-kubelet-client.key.
Next comes the Kubelet server, it is an https server api server that runs on each node. Responsible for managing the node. That is where the api-server talks to, to monitor the node as well as the information regarding the what pods to schedule on this node.
As such you need a key-certificate pair for each node in the cluster.
Why do you need these certificates?! Are they all going to be named kubelet?! No, they will be named after their nodes. node01, node02, ...etc.
# [1]: Private key, CSR, and crt for kubelet on node01
openssl genrsa -out node01.key 2048
openssl req -new -key node01.key -out node01.csr -subj "/CN=node01"
openssl x509 -req -in node01.csr -out node01.crt -CA ca.crt -CAkey ca.key
Once the certificates are created, use them in the kubelet configuration file. AS always you specify the CA root certificate file path. And then provide the kubelet node certificates.
apiVersion: kubelet.config.k8s.io/v1
kind: KubeletConfiguration
authentication:
  x509:
    clientCAFile: "/var/lib/kubernetes/ca.crt"
authorization:
  mode: Webhook
clusterDomain: "cluster.local"
clusterDNS:
  - "10.32.0.10"
podCIDR: "${POD_CIDR}"
resolvConf: "/run/systemd/resolve/resolv.conf"
runtimeRequestTimeout: "15m"
tlsCertFile: "/var/lib/kubelet/node01.crt"
tlsPrivateKeyFile: "/var/lib/kubelet/node01.key"
You must do the above for each node in the cluster.
We also talked about a set of client certificates that will be used by kubelet to communicate with the kube-apiserver. These are used by the kubelet to authenticate themselves into the kube-apiserver. That need to be generated as well.
What do you name these certificates?!
The apiserver needs to know which node is authenticated and give it the right set of permissions. So, it requires the nodes to have the right names in the right format.
Since the nodes are system components, like the kube-scheduler, kube-controller-manager, the format must start with a system: keyword followed by node then node name.
How would the apiserver give it the right set of permissions?!
Remember we specified the group name for the admin user so the admin user gets administrative privileges. Similarly, the nodes must be added to a group named system:nodes. Once the certificate are generated they go into the kube config file.
# [1]: Private key, CSR, and crt for kubelet client on node01
openssl genrsa -out node01-client.key 2048
openssl req -new -key node01-client.key -out node01-client.csr -subj "/CN=system:node:01"
openssl x509 -req -in node01-client.csr -out node01-client.crt -CA ca.crt -CAkey ca.key
Next section will discuss how you can view certificate information and how certificates are configured by the kubeadm.
Viewing Certificates
How can you view certificates in an existing cluster?!
Imagine you joined a new team to help them manage a their kubernetes environment. You are a new administrator to this team and you have been told that there are multiple issues related to certificates in the environment. So you are asked to perform a health check of all the certificates in the entire cluster.
What do you do?!
First or all it is import to know how the cluster was setup. There are different solutions available of deploying a kubernetes cluster and they use different methods to generate and manage certificates.
if you were to deploy kubernetes from scratch The Hard Way you will generate all the certificates by yourself as we did in the previous lecture. Or else if you were to rely on an automated provisioning tool like kubeadm, it takes care of automatically generating all and configuring the cluster for you. While you deploy all the components as native services on the nodes in The Hard Way, the kubeadm tool deploys these as PODs.. So, it is important to know where to look at to view the right information.
Kubeadm
In this section we will discuss a cluster provisioned by kubeadm as an example in order to perform a health check of the certificates in the cluster.
Start by identifying all the certificates used in the system. The idea is to create a list of certificate files used their path, the names configured on them, the alt names configured, the organization, the issuer, and the expiration date.
How do you get these?! Start with the certificate file used. For this in an environment provisioned by kubeadm look for the kube-apiserver definition file under /etc/kubernetes/manifests/kube-apiserver.yaml.
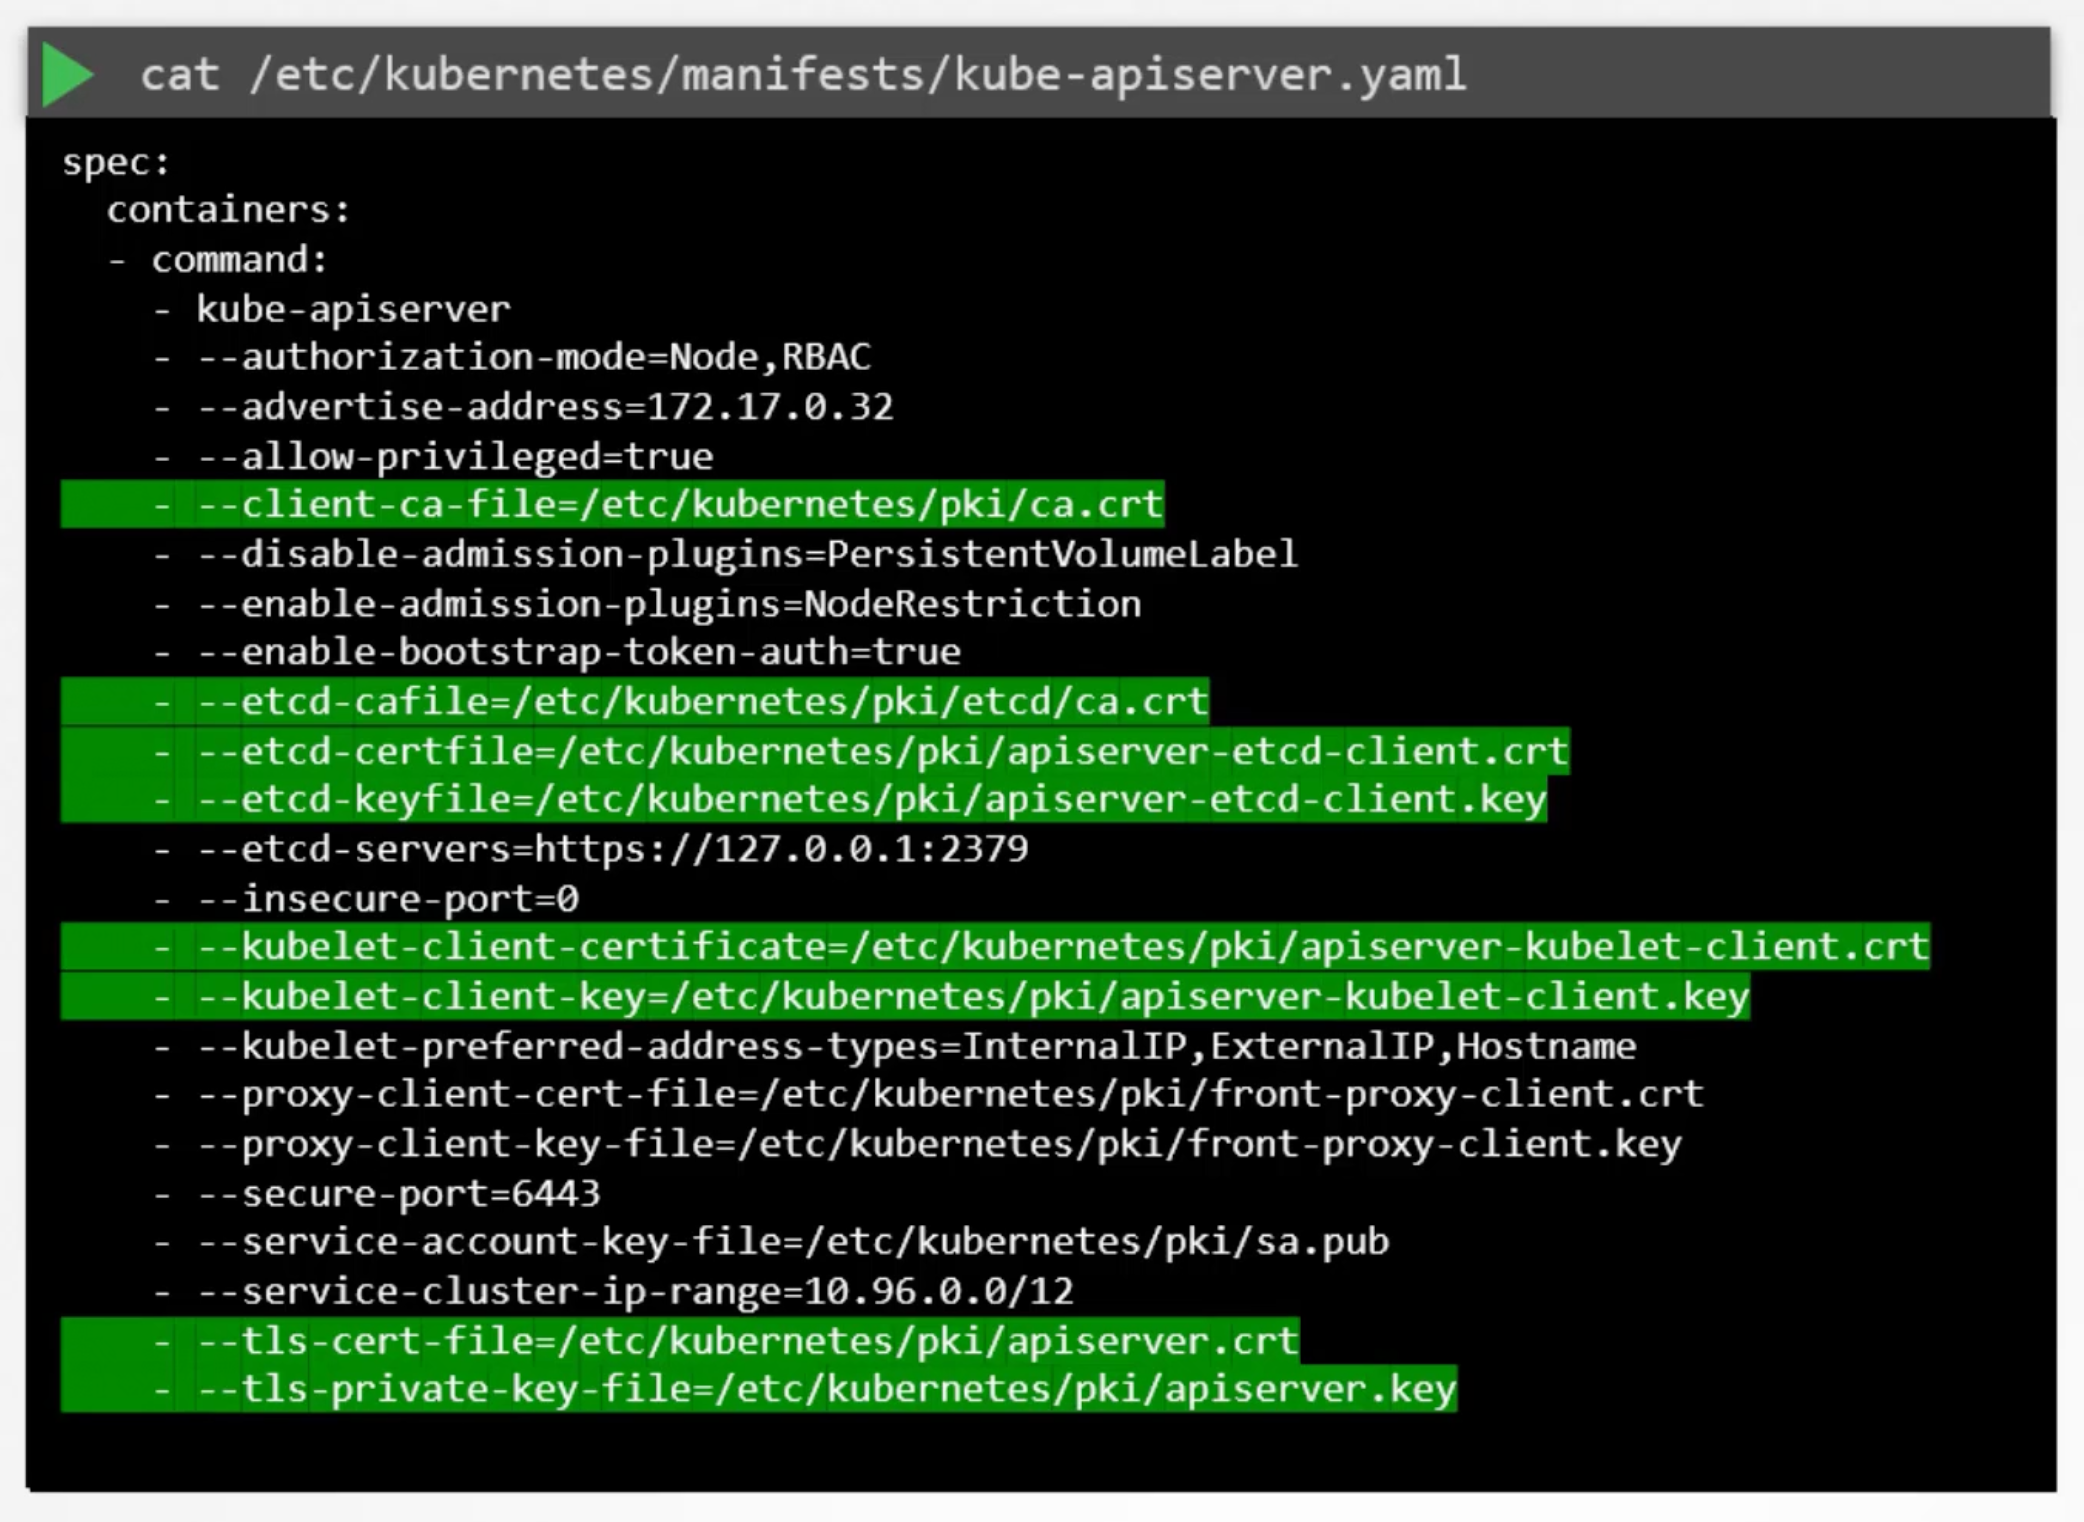
The command used to start the kube-apiserver has information about all the certificates. Identify them and note them down.
Next take each certificate and look inside inside it to find more details about that certificate.
E.g. kube-apiserver certificate file
Found at /etc/kubernetes/pki/apiserver.crt.
openssl x509 -in /etc/kubernetes/pki/apiserver.crt -text -noout
- Start with the name on the certificate, under the subject section.
Subject: CN=kube-apiserver. - Then go for the
Subject Alternative Name (SAN)field. The kube-apiserver have many. So, you must ensure all of them are there. - Then check the validity section of the certificate to identify the expiration date.
- Then the issuer of the certificate. This should be the CA that signed the certificate. kubeadm names the kubernetes CA as
kubernetesitself.
Follow the same process to identify information about all the certificates in the cluster.
Check to make sure you have the right names, the right alt names, make sure the certificate is a part of the correct organization, and most importantly they are issued by the right CA. And that the certificates are not expired.
The certificate requirements are listed in detail in the kubernetes documentation. You can check it here
| Component | Type | Certificate Path | CN | SAN | Organization | Issuer | Expiration |
|---|
You can access the above table filed here.
Troubleshooting
When you run into issues you want to start looking at logs. If you setup the cluster from scratch by yourself and the services are configured as native services on the nodes. You can start looking at the service logs. Using the operating system logging functionality.
journalctl -u etcd.service -l
In case you setup the cluster with kubeadm then the various components are running as PODs. You can start looking at the POD logs using: kubectl logs <pod-name> -n kube-system.
Sometimes if the core component such as the kube-apiserver or the etcd server are down, the kubectl command will NOT work. In that case you have to go one level down to docker to look at the logs.
docker ps -a
docker logs <container-id>
Certificate API
The CA in kubernetes is just a certificate and a key. If you placed them in a server that is your CA server. The kubeadm tool stores the CA certificate and key in the /etc/kubernetes/pki directory. So the control plane or the master node is also our CA server.
We need automate signing and rotation of certificates and keys.
Example
Jane is joining the team as an administrator.
openssl genrsa -out jane.key 2048
openssl req -new -key jane.key -out jane.csr -subj "/CN=jane"
Then jane sends the jane.csr to the administrator "ziadh". Ziad then takes the key and create a certificate signing request object.
cat jane.csr | base64 -w 0
apiVersion: certificates.k8s.io/v1
kind: CertificateSigningRequest
metadata:
  name: jane
spec:
  expirationSeconds: 600
  usage:
    - digital signature
    - key encipherment
    - server auth
  request: TheENCODEDCSR
apiVersion: certificates.k8s.io/v1
kind: CertificateSigningRequest
metadata:
  name: akshay
spec:
  groups:
  - system:authenticated
  request: LS0tLS1CRUdJTiBDRVJUSUZJQ0FURSBSRVFVRVNULS0tLS0KTUlJQ1ZqQ0NBVDRDQVFBd0VURVBNQTBHQTFVRUF3d0dZV3R6YUdGNU1JSUJJakFOQmdrcWhraUc5dzBCQVFFRgpBQU9DQVE4QU1JSUJDZ0tDQVFFQXV5ZGRkb08yUDMyclJYNHNkRzYwNDF6S0lUVGN1UHNnNC9lVXFBdUUvNmgvCnRXUm52NXc1cm15WCtoay9oRklEaFZaektGSlhEWGFZMU0wK1pOQzcrMDBXSE9UZCswbGFheTg1bmx6WmZBZk4KNTRVRGRRVnZ1b3ZOTDN3UmFrZFU5RXlxOERKNWV6UytGS1hqYldlajZKb2pCMlFTTzVrWWVoTkpSeGJjdW1kYQpGNUo3SmN5ei80bzJHa3JkMU11NUFybktLKzZhczBxK2wyMyttN0x3d04rdVdkWTlFSDRML3p3SjAwb25VY21tCjk0bHJzcWpaL2hyWUJXY0UyNXAwUXJhNjBxcUg5bmR1YlUvQmNpdlR2dkoxTnFLVVVOY2Z3Yy9zb3VhS2tKNDIKdFNWblR0MGRoWG9aakRUdlM0dmxUSlgwVWd3WW9jeFA2WVRBbGo4ck53SURBUUFCb0FBd0RRWUpLb1pJaHZjTgpBUUVMQlFBRGdnRUJBQ3VKMEsya1RiZGN4b1MxYWovYVA3MnFnVTQzVklHNyttWkhHd3ltT0FTNEhGeUl5K2NOCmhzQ2NsUTM2M0FYUkhEeWowMng1RjJkR2p0VWc3d3V1M1hwSHBkaVdWY1d5ZmdtWUlXZ3ZUVDAzZzVXb0E1Ri8Kam9NbUVPc0NLWnNWSmJ5Z2Y4emdnQkpldklyZVFBbXFKak9Nd1hXYzk3U2ZxMEhBZEZEd0xzTFAyTEdldTdsTApsTUt6WTN4cVV4UFI3MlppZHVoZCsxdFV0QzkrMDVqRGtyQ01DdHhraWJEQjBYNmJoNUZuVm9haWhjZCtUbzc3CnZFbzBhcnhmWUNZRm85Q0ZDWGU1UXNKaGM1M1JmOWJDa2V4V0p1Um5GUitWWXI1aFhjL0czeHk4eUk1VHc2LysKQlJ3ZnR4NndZeGErRW9PMVVQYklKN0NoU0VwUkFNL3o5NjA9Ci0tLS0tRU5EIENFUlRJRklDQVRFIFJFUVVFU1QtLS0tLQo=
  signerName: kubernetes.io/kube-apiserver-client
  usages:
  - client auth
Submit the request, once the object is created all certificate signing request can be seen by administrators. By running kubectl get csr. Identify the new request. Then approve the request by kubectl certificate approve jane. Kubernetes signs the certificate using the CA key pairs and generates a certificate for the user.
kubectl certificate approve jane
kubectl certificate deny agent-smith
kubectl delete csr agent-smith
This certificate can then be extracted and shared with the user. You can view the certificate in a yaml format. kubectl get csr jane -o yaml.
# Use the -r (or --raw-output) option to emit raw strings as output:
kubectl get csr jane -o json | jq -r '.status.certificate' | base64 -d > jane.crt
k get csr akshay -o json | jq -r '.status.certificate' | base64 -d > akshay.crt
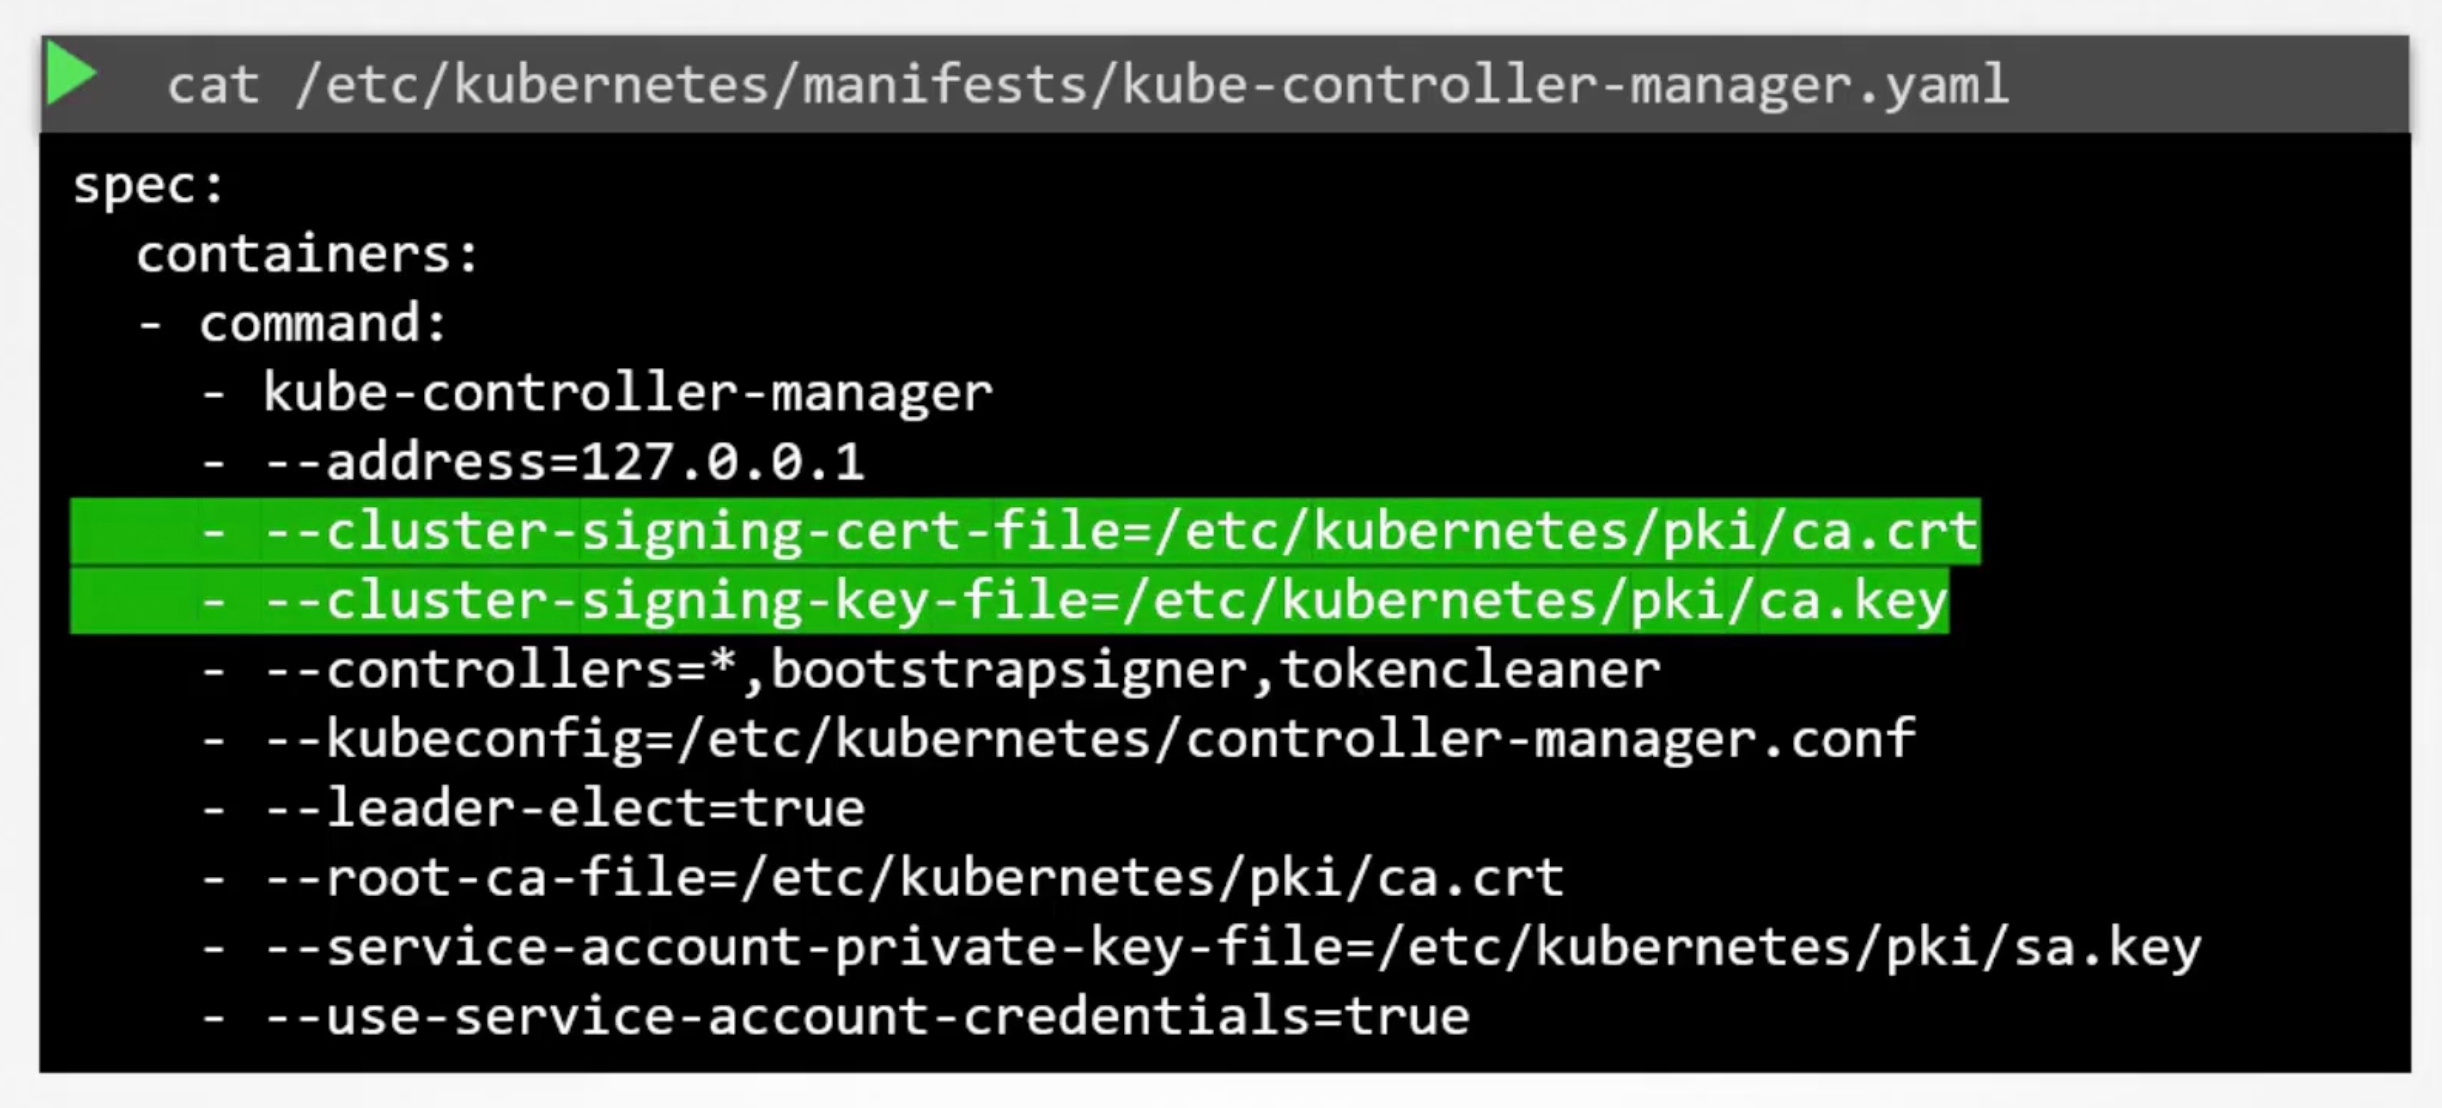
All the certificate related operations are carried out by the controller manager. If you look closely you will see it has controllers in it called CSR Approving and CSR Signing. They are responsible for carrying out these specific tasks.
We know that if anyone has to sign certificates, they need the ca root certificate and key. The controller manager server configuration has two options --cluster-signing-cert-file=/etc/kubernetes/pki/ca.crt and --cluster-signing-key-file=/etc/kubernetes/pki/ca.key.
how we eliminated service outages from certificate expired by setting up alerts with grafana and prometheus
KubeConfig
You can use kubelet get pods --server=https://kube-apiserver-ip:6443 --client-certificate=admin.crt --client-key=admin.key --certificate-authority=ca.crt to authenticate into the kube-apiserver. But this is not practical.
Instead of that kubectl get pods --kubeconfig=config-file but the default value is ~/.kube/config.
The config file has three sections. Clusters, Users, and Contexts.
Clusters are the various kubernetes clusters you have access to. Users are user accounts with which you have access to these clusters. These users have different privileges on different clusters. Finally, contexts marry this together. Context define which user account used to access which cluster. For example you could create a context named admin@production will use the admin user to access the production cluster.
Remember you are creating any new users or configuring any kind of user access or authorization in the cluster. With this process you are using existing users with their existing privileges and defining what user you are going to use to access what cluster. That way you don't have to specify the user certificates and server address in each and every kubectl command.
The server endpoint --server=https://kube-apiserver-ip:6443 goes into the cluster section. Also, the CA root certificate --certificate-authority=ca.crt goes into the cluster section.
The admin user keys and certificates --client-certificate=admin.crt --client-key=admin.key goes into the user section.
Example
Each of the sections are array format.
apiVersion: v1
kind: Config
clusters:
contexts:
users:
apiVersion: v1
kind: Config
current-context: my-kube-admin@my-kube-playground
clusters:
  - name: my-kube-playground
    cluster:
      server: https://kube-apiserver-ip:6443
      certificate-authority: /etc/kubernetes/pki/ca.crt
contexts:
  - name: my-kube-admin@my-kube-playground
    context:
      cluster: my-kube-playground
      user: my-kube-admin
      namespace: finance
users:
  - name: my-kube-admin
    user:
      client-certificate: /etc/kubernetes/pki/users/admin.crt
      client-key: /etc/kubernetes/pki/users/admin.key
How does kubectl know which context to use?!
You can specify default context by adding a field current-context: my-kube-admin@my-kube-playground.
# It list the current file being used, default is ~/.kube/config
kubectl config view

kubectl config use-context ziadh@google-cloud
kubectl config use-context admin@production

kubectl config -h

kubectl config get-contexts

# get current context
kubectl config current-context

# kubectl config with custom kubeconfig file
kubectl --kubeconfig=my-kube-config.yaml get pods
Each cluster might be configured with multiple namespaces in it. You can configure a context to use a specific namespace in a cluster.
A word on certificates, you have seen path to certificate files mentioned in the kubeconfig file like that. It is better to use the full path.
Commands
# Get number of users
kubectl config view -o json | jq '.users|length'
# Get number of clusters
kubectl config view -o json | jq '.clusters|length'

# Custom kubeconfig file
kubectl --kubeconfig /root/my-kube-config config view -o json | jq

# Get context where name is research
kubectl --kubeconfig /root/my-kube-config config view -o json | jq '.contexts[]|select(.name == "research")'

# Get client-certificate for a specific user
kubectl --kubeconfig /root/my-kube-config config view -o json | j
q -r '.users[]|select(.name == "aws-user")|.user."client-certificate"'

# Get Current Context
kubectl --kubeconfig /root/my-kube-config config current-context
test-user@development
Practice JQ
apiVersion: v1
clusters:
- cluster:
    certificate-authority: /etc/kubernetes/pki/ca.crt
    server: https://controlplane:6443
  name: development
- cluster:
    certificate-authority: /etc/kubernetes/pki/ca.crt
    server: https://controlplane:6443
  name: kubernetes-on-aws
- cluster:
    certificate-authority: /etc/kubernetes/pki/ca.crt
    server: https://controlplane:6443
  name: production
- cluster:
    certificate-authority: /etc/kubernetes/pki/ca.crt
    server: https://controlplane:6443
  name: test-cluster-1
contexts:
- context:
    cluster: kubernetes-on-aws
    user: aws-user
  name: aws-user@kubernetes-on-aws
- context:
    cluster: test-cluster-1
    user: dev-user
  name: research
- context:
    cluster: development
    user: test-user
  name: test-user@development
- context:
    cluster: production
    user: test-user
  name: test-user@production
current-context: test-user@development
kind: Config
preferences: {}
users:
- name: aws-user
  user:
    client-certificate: /etc/kubernetes/pki/users/aws-user/aws-user.crt
    client-key: /etc/kubernetes/pki/users/aws-user/aws-user.key
- name: dev-user
  user:
    client-certificate: /etc/kubernetes/pki/users/dev-user/developer-user.crt
    client-key: /etc/kubernetes/pki/users/dev-user/dev-user.key
- name: test-user
  user:
    client-certificate: /etc/kubernetes/pki/users/test-user/test-user.crt
    client-key: /etc/kubernetes/pki/users/test-user/test-user.key
API Groups
# Get version at master node
curl https://kube-master:6443/version

curl https://kube-master:6443/api/v1/pods
Our focus in this section is on these api pods /version and /api. The kubernetes API is grouped into multiple such groups. Based on their purpose and functionality. Such:
/metrics./healthz./version./api./apis./logs.
We will focus on the apis responsible for the cluster functionality. The /api and /apis groups.
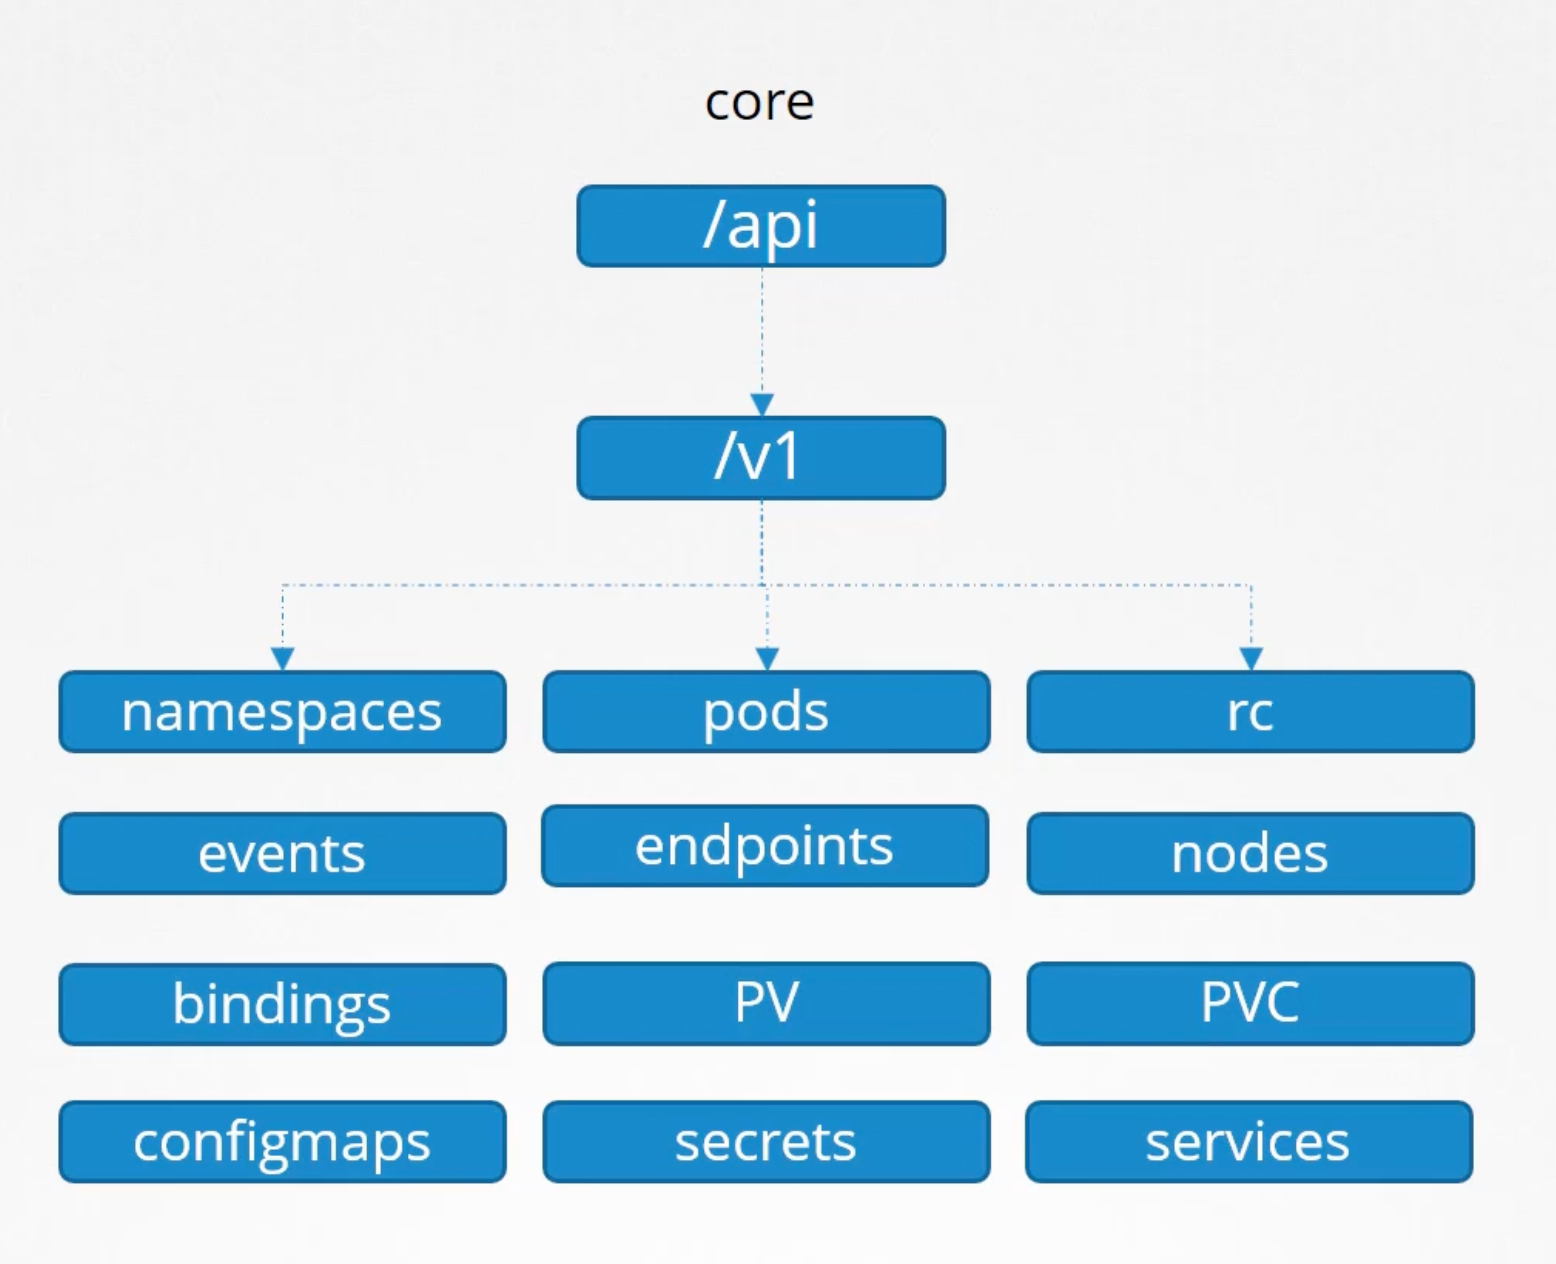
They are categorized into to core group /api and the named group /apis.
The core group is where all the functionality exist.
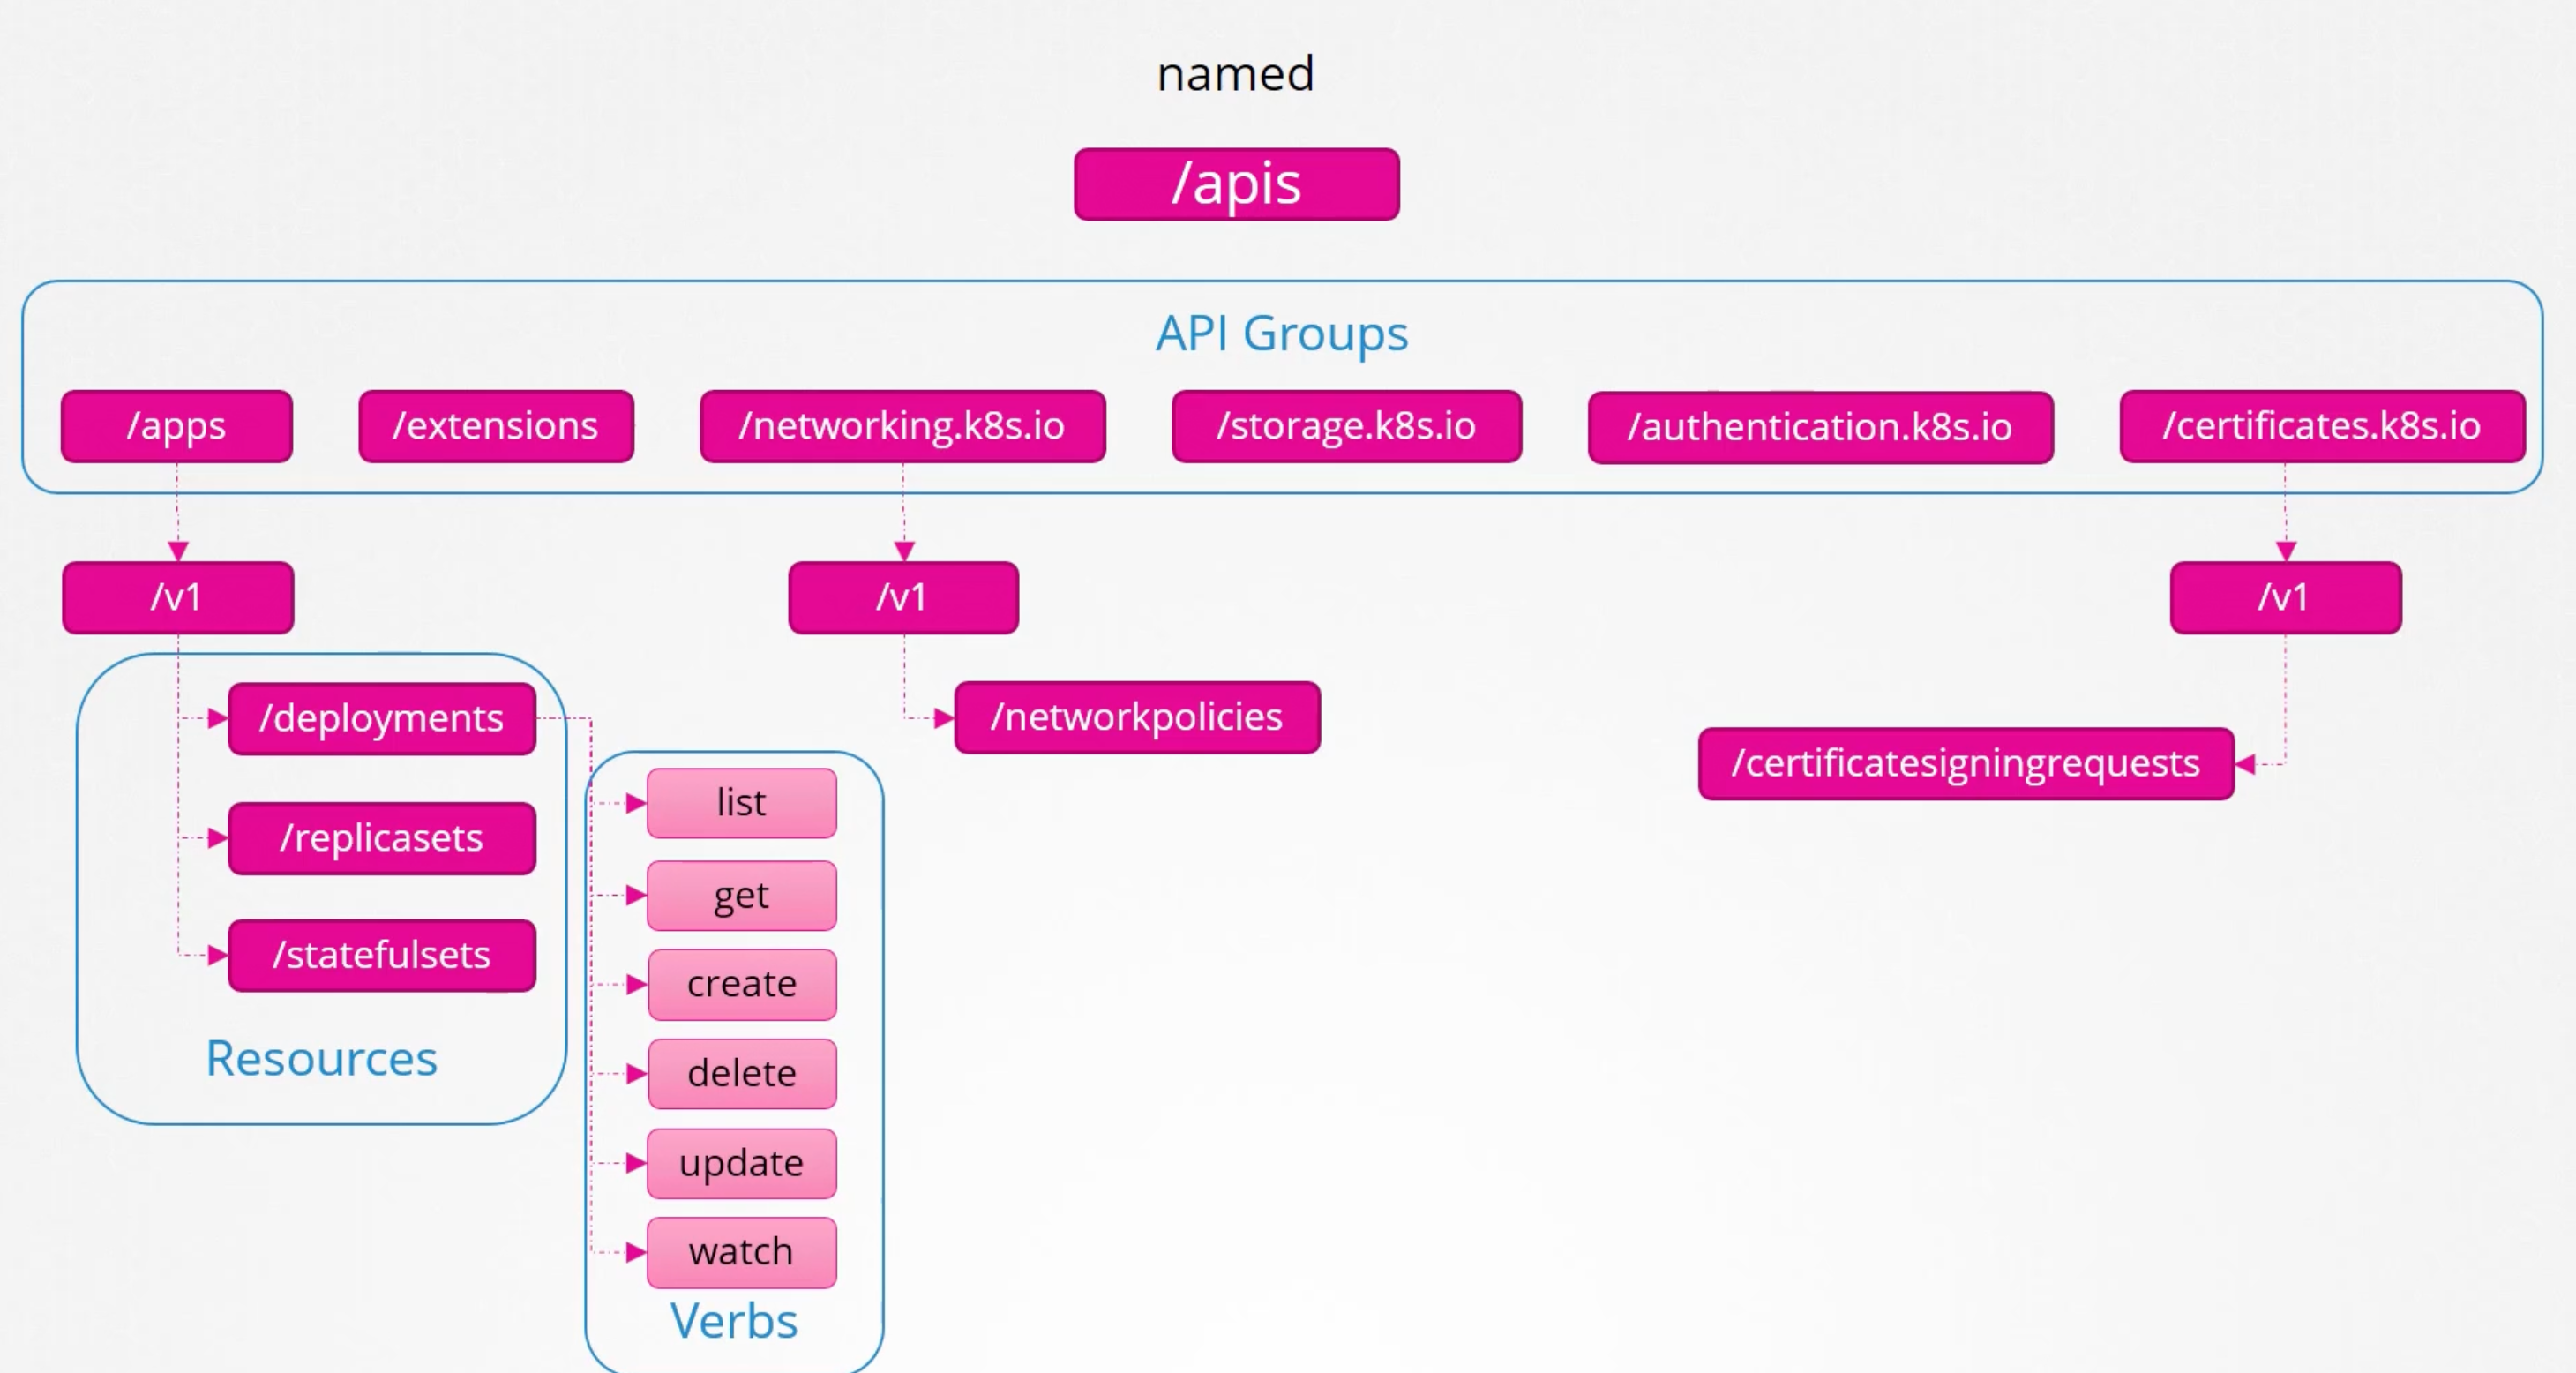
The named group api are more organized, and going forward all the newer features will be made available in the named group api.
curl https://kube-master:6443 -k

curl https://kube-master:6443/apis -k | grep "name"
You need either to pass certificates --key admin.key --cert admin.crt --cacert ca.crt or start a kubectl proxy client.
kubectl proxy
Starting to serve on 127.0.0.1:8001

curl http://localhost:8001 -k
kube proxy DOES NOT EQ kubectl proxy.
Kube proxy is used to enable connectivity between pods and services across different nodes in the cluster. We will discuss it in the networking section much more details.
kubectl proxy is an http proxy service. Created by kubectl utility. To access the kube-apiserver.
Key takeaways
All resources in kubernetes are grouped into different API groups. At the top level you have core api group and named groups. Under the named api group. You have one for each section under this API group you have the different resources and each resource has a set of associated actions known as verbs. In the next section on authorization we can see how use these to allow or deny users access to these resources.
Authorization
Once they gain access what can they do. This is where authorization comes in. As an admin you are able to perform any operation on the cluster. But you want to implement the principle of least privilege.
Give the minimum access level required to perform the task.
Like allow them to view but not modify. Or restrict access to namespace alone. There are different authorization mechanisms available in kubernetes. E.g. Node Authorization, Attribute Based Access Control - ABAC, Role Based Access Control - RBAC, Webhook.
There are two more modes alwaysDeny and alwaysAllow. The modes are set using the --authorization-mode flag in the kube-apiserver configuration file. The default is AlwaysAllow. You may provide comma separated values for multiple modes e.g. --authorization-mode=Node,RBAC,Webhook.
When you have multiple modes enabled. The request is authorized using each one IN THE ORDER it specified. E.g. When a user sends a request it is first handled by the Node Authorizer. The node authorizer handles only node requests. So, it denies the request. Whenever a module denies the request it is forwarded to the next next one in the chain. The role based access control module performs its checks and grants the user permission. Authorization is complete and the user is given access to the requested resource. As soon as a module grants permission no more checks are done and the user is granted permission.
Node Authorization
We know that the kube-apiserver is accessed by users for management purposes as well as the kubelet on nodes within the cluster for management purposes. The kubelet accesses the apiserver to read information about services, endpoints, nodes and pods. The kubelet also reports to the kube-apiserver with information about the node such as status, pod status and events. These request are handled by a special authorizer called the Node Authorizer.
Any request coming from a user with the name prefixed by system:node e.g. system:node:node01 and part of the SYSTEM:NODES group is authorized by the node authorizer and are granted these privileges.
The above is access within the cluster.
ABAC
Is where you associate a user or a set of users with a set of permissions. E.g. dev-user can create, delete, view pods in the development namespace.
YOu create a policy file with a set of policies defined in it in a json format.
{
  "kind": "Policy",
  "spec": {
    "user": "dev-user",
    "namespace": "*",
    "resource": "pods",
    "apiGroup": "*",
  }
}
You pass this file into the kube-apiserver configuration file. --authorization-mode=ABAC --authorization-policy-file=/path/to/policy.json. Similarly we create a policy definition file for each user or group in this file. Every time you need to add or make a change in the security. You must edit this file manually and restart the kube-apiserver.
As such the ABAC are difficult to manage and maintain. We will look at RBAC next.
RBAC
Role Based Access Control made this much easier. With RBAC instead of directly associating a user or a group with a set of permissions. We define a role.
In this case for developers. We create a role with a set of permissions required for developers. Then we associate all the developers to that role. E.g. Can create, delete, view pods in the development namespace.
Also, create a role for security team with a set of permissions required for security team. And associate all the security team members to that role. E.g. Can view csr and approve csr.
Going forward whenever a change is need to be changed, we simply modify the role and it reflects on all developers immediately.
Webhook
Simply, outsource all the authorization mechanisms. Open Policy Agent for example.
RBAC
apiVersion: rbac.authorization.k8s.io/v1
kind: Role
metadata:
  name: developer
rules:
  - apiGroups: [""]
    resources: ["pods"]
    verbs: ["list", "get", "create", "update", "delete"]
  - apiGroups: [""]
    resources: ["ConfigMap"]
    verbs: ["create"]
Next step is to link the user to the role using a role binding.
apiVersion: rbac.authorization.k8s.io/v1
kind: RoleBinding
metadata:
  name: devuser-developer-binding
subjects:
  - kind: User
    name: dev-user
    apiGroup: rbac.authorization.k8s.io
roleRef:
  kind: Role
  name: developer
  apiGroup: rbac.authorization.k8s.io
Note
RoleandRoleBindingare namespaced resources.
Useful commands:
kubectl get roles
kubectl get rolebindings
kubectl describe role developer
kubectl describe rolebinding devuser-developer-binding

# Check if the user has access to the resource
kubectl auth can-i create pods --as dev-user --namespace development # Only if you are an admin
kubectl auth can-i create deployments
kubectl auth can-i create nodes

kubectl auth whoami
Resource Names
We can go one level down and allow access to specific resources. E.g. Allow access to only a specific pod.
SAy you have five pods in a namespace, blue, green, orange, purple, pink. You can restrict access to blue and orange. by adding a resource name field in the role definition.
apiVersion: rbac.authorization.k8s.io/v1
kind: Role
metadata:
  name: blue-orange-dev
rules:
  - apiGroups: [""]
    resources: ["pods"]
    resourceNames: ["blue", "orange"]
    verbs: ["list", "create", "update"]
Commands
# Get Authorization Mode used in the cluster
kubectl -n kube-system get po kube-apiserver-controlplane -o json | jq '.spec.containers[].command[] | select(startswith("--authorization-mode="))'
Cluster Roles
Roles and RoleBindings are namespaced resources. They are limited to a specific namespace.
Can you isolate nodes in a namespace?! like node01 is part of the development namespace. No because they are cluster wide or cluster based resources.
So the resources are catagories into two types. Namespaced resources and cluster wide/scoped resources. The below is not a comprehensive list of resources:
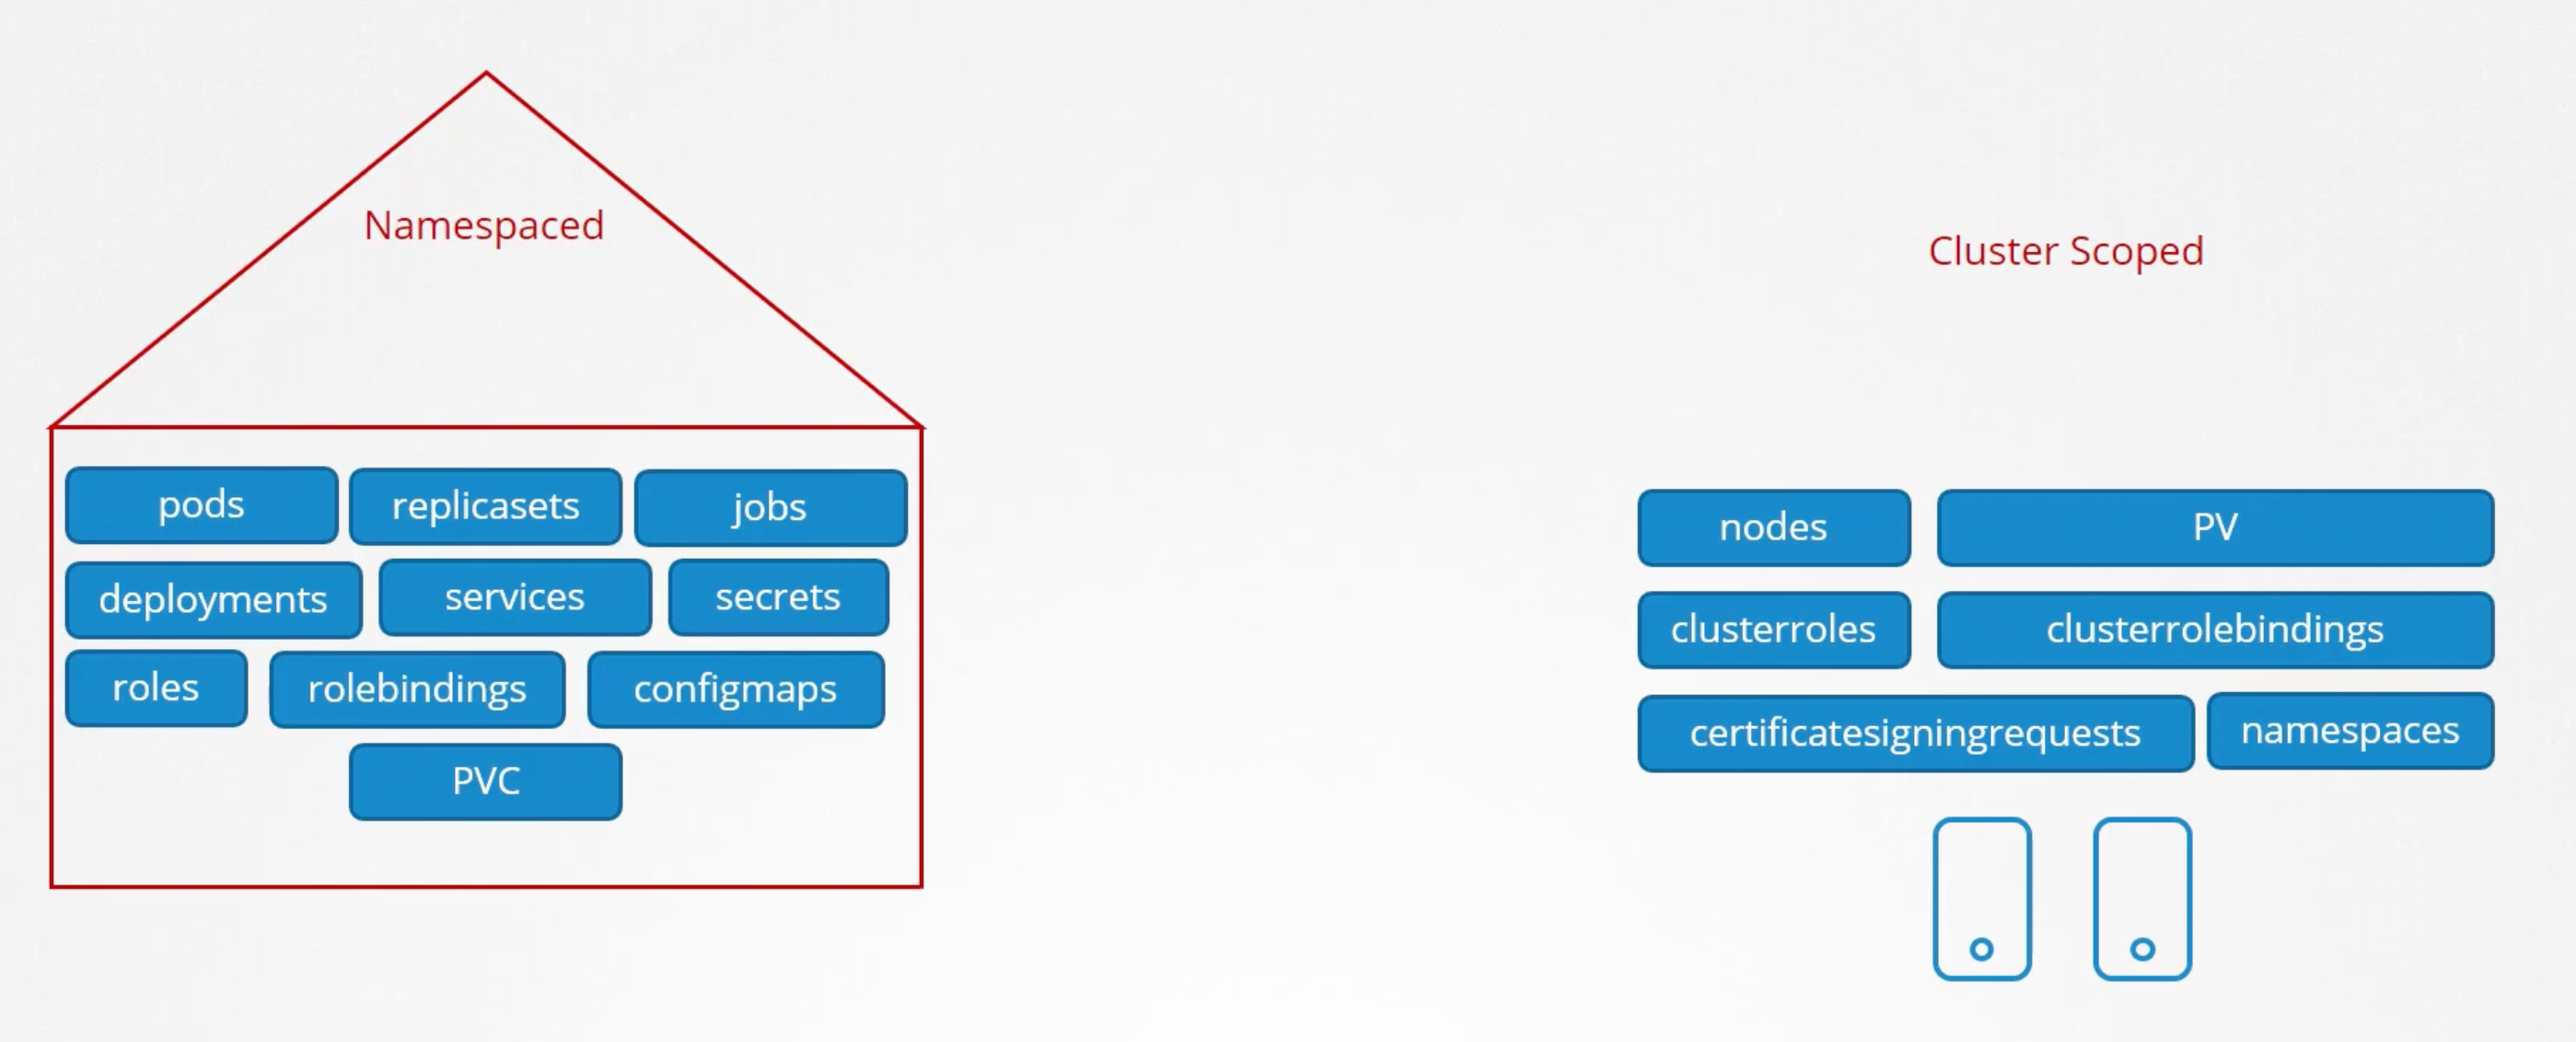
To see a full list of resources you can run kubectl api-resources --namespaced=True and kubectl api-resources --namespaced=False.
Cluster Role
The are just like roles but they are for cluster scoped resources.
E.g. a cluster-admin role can be created to provide permissions to administers to view, create and delete nodes. Similarly a storage-admin role with view create and delete permissions for storage resources "PVs".
apiVersion: rbac.authorization.k8s.io/v1
kind: ClusterRole
metadata:
  name: cluster-administrator
rules:
- apiGroups: [""]
  resources: ["nodes"]
  verbs: ["list", "get", "create", "update", "delete"]
---
apiVersion: rbac.authorization.k8s.io/v1
kind: ClusterRoleBinding
metadata:
  name: cluster-admin-role-binding
subjects:
- kind: User
  name: cluster-admin
  apiGroup: rbac.authorization.k8s.io
roleRef:
  kind: ClusterRole
  name: cluster-administrator
  apiGroup: rbac.authorization.k8s.io
U can include namespaced resource in a cluster role.
If you used namespaced resources in a cluster role. When you do that the user will have access to all the resources across all namespaces.
Kubernetes create a list of ClusterRoles by default when the cluster is first setup.
Service Accounts
The concept of service accounts is liked to other security related concepts in kubernetes, such as authentication, authorization and RBAC...etc.
There are two types of accounts in kubernetes. User accounts and service accounts. E.g. ziadh is a user account and prometheus is a service account.
E.g. made a python app that expose a kubernetes dashboard listing all the pods in the cluster.
kubectl create serviceaccount dashboard-sa
kubectl get sa
When a service account is created, kubernetes creates a token automatically for that service account.
kubectl describe sa dashboard-sa
The sa token is what must be used by the external application while authenticating to the kubernetes api. The token is stored as a secret object in the same namespace as the service account. kubectl describe secret dashboard-sa-token-xxxxx.
curl https://kube-apiserver-ip:6443/api -insecure --header "Authorization: Bearer <token>"
Flow
- Create a service account.
- Assign the right permissions using a RBAC role.
- Export your token. Use it in your application.
What is your third party application is hosted on the kubernetes cluster itself?! In that case the whole process of exporting the sa token and configuring the third-party application to use it, can be made simple by automatically mounting the sa token secret as a volume inside the pod running the application.
There is a default service account for every namespace. Each namespace has its own default service account. Whenever a pod is created the default sa and its token are automatically mounted as a volume inside the pod.
The default sa is very much restricted. It has very limited permissions to run the basic kubernetes api calls.
apiVersion: v1
kind: Pod
metadata:
  name: <pod-name>
spec:
  serviceAccountName: <service-account-name>
  automountServiceAccountToken: false
  containers:
  - name: <container-name>
    image: <image-name>
You can not edit the sa of an existing pod. You must delete and recreate the pod. However, incase of a deployment. You will be able to edit the service account. As any changes to the pod definition file will trigger a new rollout.
Recent Changes
In kubernetes v1.22 and v1.24
kubectl exec -it <pod-name> ls /var/run/secrets/kubernetes.io/serviceaccount
kubectl exec -it <pod-name> cat /var/run/secrets/kubernetes.io/serviceaccount/token
jq -R 'split(".") | select(length > 0) | .[0],.[1] | @base64d | fromjson' <<< kubectl exec -it <pod-name> cat /var/run/secrets/kubernetes.io/serviceaccount/token
Or used jwt.io to decode the token. You will find it has NO expiration date defined in the payload.
Problems:
- Existing tokens are not time-bound. And exist as long as the sa exists.
- Each JWT require a separate secret object per service account. Which results in a scalability issue.
v1.22
As such in v1.22 the TokenRequestAPI was introduced as kubernetes enhancement proposal KEP-1205: Bound Service Account Tokens. That aimed to introduce a mechanism for provisioning kubernetes service account tokens that are more secure and scalable via an API. So tokens generated by the token request API are audience bound and they are time-bound and object bound. Hence, they are more secure and scalable.
Since v1.22 when a new pod is created, it no longer relies on the service account secret token. Instead a token with a defined lifetime is generated through the token request API. by the service account admission controller when the pod is first created. And this token is then mounted as a projected volume into the pod.
Previously, it was mounted as a secret object. Now it is mounted as a projected volume that communicated with the token controller, the token request API and it gets a token for the pod.
apiVersion: v1
kind: Pod
metadata:
  name: <pod-name>
spec:
  containers:
  - name: <container-name>
    image: <image-name>
    volumeMounts:
    - name: kube-api-access-6mtg8
      mountPath: /var/run/secrets/kubernetes.io/serviceaccount
      readOnly: true
  volumes:
    - name: kube-api-access-6mtg8
      projected:
        sources:
        - serviceAccountToken:
          path: token
          expirationSeconds: 3607
v.1.24
Another enhancement proposal KEP-2799: Reduction of Secret-based Service Account Tokens. In the past when a sa is created it automatically created a secret object with a token that had no expiration date, and is not bound to any audience. This was then automatically mounted as a volume inside any pod that uses that sa.
In
v1.22that was changed the automatic mounting of the secret object to the pod, was changed. And instead it then moved to the token request API.
With version v1.24 a change was made when you create a sa, it no longer automatically creates a secret or a token access secret. You must run the command kubectl create token <sa-name>. It will print that token to the screen.
Copy the token and then decode it:
kubectl create token <sa-name> | pbcopy
jq -R 'split(".") | select(length > 0) | .[0],.[1] | @base64d | fromjson' <<< pbpaste
It will have an expiration date specified in the payload. If you did not specify any time limit then it is set to 1 hour by default. From the time you ran the command. You can pass additional options to increase the time limit.
Post v1.24
If you want to create secrets with non-expiring tokens.
- Create the SA.
- Create the secret object.
apiVersion: v1
kind: Secret
type: kubernetes.io/service-account-token
metadata:
  name: <secret-name>
  annotations:
    kubernetes.io/service-account.name: <sa-name>
That will create a NON-EXPIRING token. And associated with that sa.
Actually according to the docs [here](You should only create a service account token secret object if you can't).
You should only create a ServiceAccount token Secret if you can't use the TokenRequest API to obtain a token, and the security exposure of persisting a non-expiring token credential in a readable API object is acceptable to you. For instructions, see Manually create a long-lived API token for a ServiceAccount.
Example
kubectl create serviceaccount dashboard-sa
Side note: image used is gcr.io/kodekloud/customimage/my-kubernetes-dashboard.
---
apiVersion: v1
kind: ServiceAccount
metadata:
  name: dashboard-sa
---
kind: Role
apiVersion: rbac.authorization.k8s.io/v1
metadata:
  namespace: default
  name: pod-reader
rules:
- apiGroups:
  - ''
  resources:
  - pods
  verbs:
  - get
  - watch
  - list
---
kind: RoleBinding
apiVersion: rbac.authorization.k8s.io/v1
metadata:
  name: read-pods
  namespace: default
subjects:
- kind: ServiceAccount
  name: dashboard-sa # Name is case sensitive
  namespace: default
roleRef:
  kind: Role # this must be Role or ClusterRole
  name: pod-reader # this must match the name of the Role or ClusterRole you wish to bind to
  apiGroup: rbac.authorization.k8s.io
kubectl apply -f dashboard-sa.yaml
kubectl create token dashboard-sa
Image Security
The nginx image is docker.io/library/nginx:latest. If you don't provide a a user or account name it is assumed to be library. Library is the name if the default account where docker official images are stored. These images promote best practices and maintained by a dedicated team. Who are responsible for reviewing and publishing these images.
Registries:
- Docker:
docker.io/<account-name>/<image-name>:<tag>. - Google:
gcr.io/<project-id>/<image-name>:<tag>. - Github:
ghcr.io/<account-name>/<image-name>:<tag>.
If you use a private docker registry. Use kubernetes secrets:
kubectl create secret docker-registry <secret-name> \
--docker-server=docker.io \
--docker-username=<username> \
--docker-password=<password> \
--docker-email=<email>
docker-registry is a built-in secret type that was built for storing docker credentials.
apiVersion: v1
kind: Pod
metadata:
  name: <pod-name>
spec:
  containers:
  - name: <container-name>
    image: <image-name>
  imagePullSecrets:
  - name: <secret-name>
Docker Security
Docker containers by default run processes as root. This is a security risk. As root user have unrestricted access to system calls. E.g. chown, dac, kill, setfcap, setpcap, setgid, setuid, net_bind, net_raw, mac_admin, broadcast, net_admin, sys_admin, sys_chroot, audit_write, ...etc.
See full list at /usr/include/linux/capability.h.
By default, docker runs containers with a limited set of capabilities. So, the processes running within the container do not have the privileges to say e.g. reboot the host machine. Calls like: mac_admin, broadcast, net_admin, sys_admin, ...etc. are not allowed.
If you wish to override this behavior and provide additional privileges than what is available use the --cap-add flag. E.g. --cap-add=SYS_ADMIN. In the Docker Run Command. Similarly, you can drop capabilities using the --cap-drop flag. E.g. --cap-drop=KILL.
Or you wish to run the container with all privileges use --privileged flag. But seriously, DO NOT USE IT. It is a security risk.
Security Context
The above can be configured in kubernetes as well. In kubernetes containers are encapsulated in pods. You may choose to set security settings at a container level. Or at a pod level.
- The setting on the container will override the settings on the pod.
- The settings on the pod will be passed down to all containers.
apiVersion: v1
kind: Pod
metadata:
  name: <pod-name>
spec:
  securityContext:
    runAsUser: 1000
    runAsGroup: 3000
    fsGroup: 2000
  containers:
  - name: <container-name>
    image: <image-name>
    securityContext:
      privileged: false
      capabilities:
        add: ["SYS_ADMIN"]
        drop: ["KILL"]
Network Policies
One of the pre-requisites for networking in kubernetes is whatever solution you implement. The Pods should be able to communicate with each other without having to configure any additional settings like routes.
E.g. in this example all pods are in a virtual private network that spans all the nodes in the kubernetes cluster. And they can all by default reach each other using the ips or pod-names or services configured for that purpose.
Kubernetes is configured by default with an all allow rule, that allows traffic from any pod to any other pod or service within the cluster.
To restrict traffic between pods or services you can utilize network policies. A NetworkPolicy is another object in the kubernetes namespace. Just like pods, replica sets, services, deployments...etc.
You link a network policy to one or more Pods. And you can define rules within the network policy. E.g. Only allow ingress traffic from backend pods on Port 3306. Once this policy is created it blocks all other traffic to the pod. And only allows traffic that matches the specified rules.
You will use labels and selectors to link network policies to pods.
apiVersion: v1
kind: Pod
metadata:
  name: <pod-name>
  labels:
    role: db
spec:
  containers:
  - name: <container-name>
    image: <image-name>
---
apiVersion: v1
kind: Pod
metadata:
  name: <pod-name>
  labels:
    role: backend
spec:
  containers:
  - name: <container-name>
    image: <image-name>
---
apiVersion: networking.k8s.io/v1
kind: NetworkPolicy
metadata:
  name: db-policy
spec:
  podSelector:
    matchLabels:
      role: db
  policyTypes:
  - Ingress
  ingress:
  - from:
    - podSelector:
        matchLabels:
          role: backend
      namespaceSelector:
        matchLabels:
          name: production  # Add this label to namespace
    - ipBlock:
        cidr: 192.168.5.10/32  # Ip of backup server
    ports:
    - protocol: TCP
      port: 5432
Ingress and Egress Isolation only comes into effect if you have Ingress or Egress under policyTypes.
In the above example, there is only Ingress in the db-policy. So, only the ingress traffic is restricted. All Egress traffic is unaffected. So the pod can make any Egress calls.
apiVersion: networking.k8s.io/v1
kind: NetworkPolicy
metadata:
  name: db-policy
spec:
  podSelector:
    matchLabels:
      role: db
  policyTypes:
  - Ingress
  - Egress
  ingress:
  - from:
    - podSelector:
        matchLabels:
          role: backend
    ports:
    - protocol: TCP
      port: 5432
  egress:
  - to:
    - podSelector:
        matchLabels:
          role: db
Remember network policies are enforced by the network solution implemented in the cluster. And not all network solutions support network policies.
Support:
- Kube-router.
- Calico.
- Romana.
- Weave Net.
Does not support:
- Flannel.
Example
We have allowed Egress traffic to TCP and UDP port. This has been added to ensure that the internal DNS resolution works from the internal pod.
apiVersion: networking.k8s.io/v1
kind: NetworkPolicy
metadata:
  name: internal-policy
  namespace: default
spec:
  podSelector:
    matchLabels:
      name: internal
  policyTypes:
  - Egress
  - Ingress
  ingress:
    - {}
  egress:
  - to:
    - podSelector:
        matchLabels:
          name: mysql
    ports:
    - protocol: TCP
      port: 3306

  - to:
    - podSelector:
        matchLabels:
          name: payroll
    ports:
    - protocol: TCP
      port: 8080

  - ports:
    - port: 53
      protocol: UDP
    - port: 53
      protocol: TCP
Kubectx and Kubens
Throughout the course, you have had to work on several different namespaces in the practice lab environments. In some labs, you also had to switch between several contexts.
While this is excellent for hands-on practice, in a real “live” Kubernetes cluster implemented for production, there could be a possibility of often switching between a large number of namespaces and clusters.
This can quickly become a confusing and overwhelming task if you have to rely on kubectl alone.
This is where command line tools such as kubectx and kubens come into the picture.
You can access a Reference here.
Kubectx
With this tool, you don’t have to make use of lengthy “kubectl config” commands to switch between contexts. This tool is particularly useful to switch context between clusters in a multi-cluster environment.
sudo git clone https://github.com/ahmetb/kubectx /opt/kubectx
sudo ln -s /opt/kubectx/kubectx /usr/local/bin/kubectx
Syntax
# To list all contexts
kubectx

# To switch to a context
kubectx

# To switch back to the previous context
kubectx -

# To see the current context
kubectx -c
Kubens
This tool allows users to switch between namespaces quickly with a simple command.
sudo git clone https://github.com/ahmetb/kubectx /opt/kubectx
sudo ln -s /opt/kubectx/kubens /usr/local/bin/kubens
Syntax
# To switch to a new namespace:
kubens

# To switch back to the previous namespace:
kubens -